The tool exists to create a definition file for nftables from the fullbogons
files from Team Cymru. It can be used to filter out bogons
from incoming traffic with nftables.
There is probabily little advantage to this, but I wanted to play around with
named sets and so forth.
This is duct tape programming max. There are no tests and there is no plans
to add any. It’s for a very specific usecase I had and it’s not really going
to expand beyond this.
Usage
The intended usage is to be used in cron or systemd.timers, to generate a
definition file. The name of this file is the only argument to the program.
The file will be atomically replaced, so there should not be an instance of
a half written file, as long as rename is implemented atomically.
Extras
To make usage easier, I’ve included a systemd.timer file that will execute this
once every 4 hours roughly. This is how you can install it:
sudo install fullbogons-nftables-gen /usr/local/bin
sudo install -m644 contrib/systemd/fullbogons-nftables-gen.* /etc/systemd/system
sudo install -Dm644 contrib/nftables/example-refresh-set.nft /etc/nftables.d/refresh-fullbogons.nft

# This will fail, and that is ok, it is just to get the inital definitions file.
sudo systemctl start fullbogons-nftables-gen.service

# Then update /etc/nftables.conf with something akin to the content of
# contrib/nftables/example-ruleset.nft

# Then enable the timer
sudo systemctl enable --now fullbogons-nftables-gen.timer
I’ve also included two example nftables files. The first contrib/nftables/example-ruleset.nft
is an example usage of the defintions file. The second contrib/nftables/example-refresh-set.nft is an example usage for hotswapping the
contents of the bogons sets, without reloading the whole ruleset.
This plugin adds support for Coco/R to the IntelliJ IDEA Platform. The initial version was
developed as part of a bachelor theses and the first public release was on 2018-01-25. Maintenance will be performed on
a best effort basis.
Plugin Installation
The plugin can be installed directly from the official Jetbrains Plugin Repository or via the zip file provided on
the Releases page.
Plugin features
Syntax Highlighting – Customizable via settings page
Commenter (Block and line comments)
Syntax Error highlighting (unexpected tokens)
Reference check (report unresolvable references to characters, tokens and productions)
Declaration order check (report references to characters and tokens declared after usage)
Attributes check (productions have to be used with or without attributes according to declaration)
Highlight unused characters, tokens, pragmas and productions
Code Folding
Structure View
Find usages
Inplace rename refactorings (Compiler, Characters, Tokens, Pragmas and Productions)
Brace matching for (), [], {}, <>, <..> and (..)
Code completion (Compiler, Character, Token, Pragma and Production names)
Go to declaration
Go to symbol / Symbol search
Go to generated code (for productions)
Configurable Java language injection
Generate Scanner and Parser via menu action
Automatic detection of appropriate output folder for generated Java classes
Automatic detection of package in case no $package directive is pre
Automatic detection of appropriate output root for generated Java classes
Warnings and Errors during Coco/R execution are shown within the Problems Tool Window
Errors from generated Parser are mapped back to the grammar file
Documentation
Please refer to the attached PDF on the Releases
page. Additional documentation (as part of the README or via Wiki) will be added in the future.
IDE support limitations
In it’s current state the plugin is designed specifically for usage with the Java version of Coco/R. The language for
global fields and methods, as well as semantic actions is always assumed to be Java, which will also be injected. Due to
this fact the plugin currently cannot be used with any IDEs not including Java support (e.g. Rider, WebStorm, RubyMine,
…). If you still want to use Coco/R in any of these IDEs or a non Java version of Coco/R you have some options:
Send me a Pull request
Be patient until I get around to decouple the plugins dependency from Java support
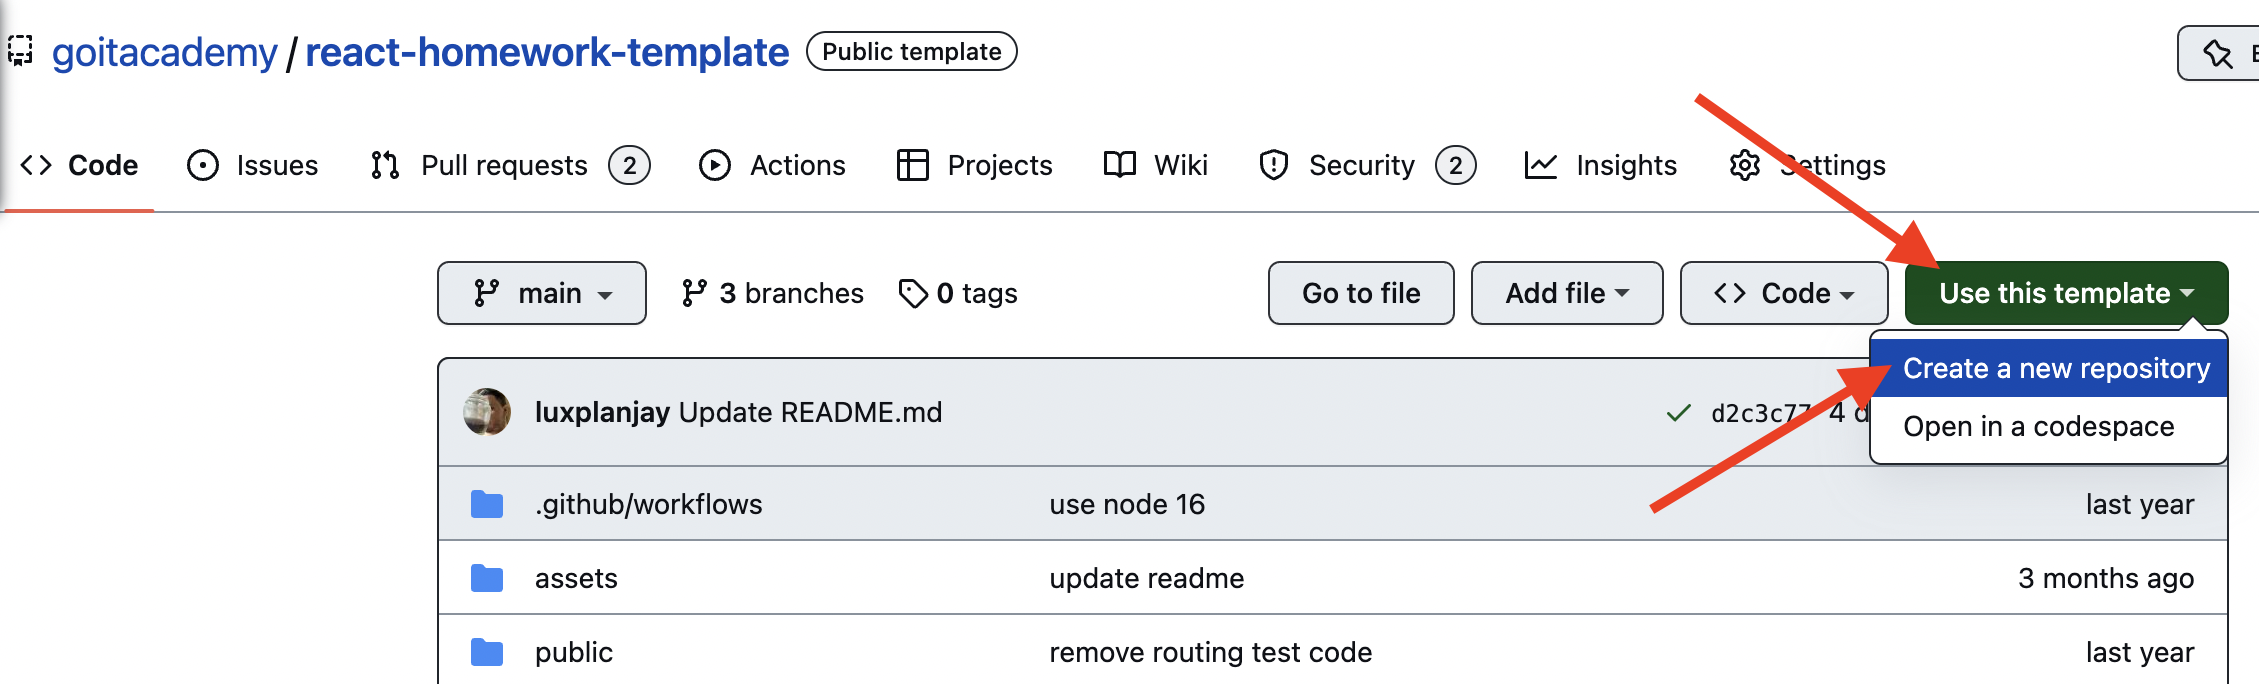
Використовуй цей репозиторій організації GoIT як шаблон для створення репозиторію
свого проєкта. Для цього натисни на кнопку «Use this template» і вибери опцію
«Create a new repository», як показано на зображенні.
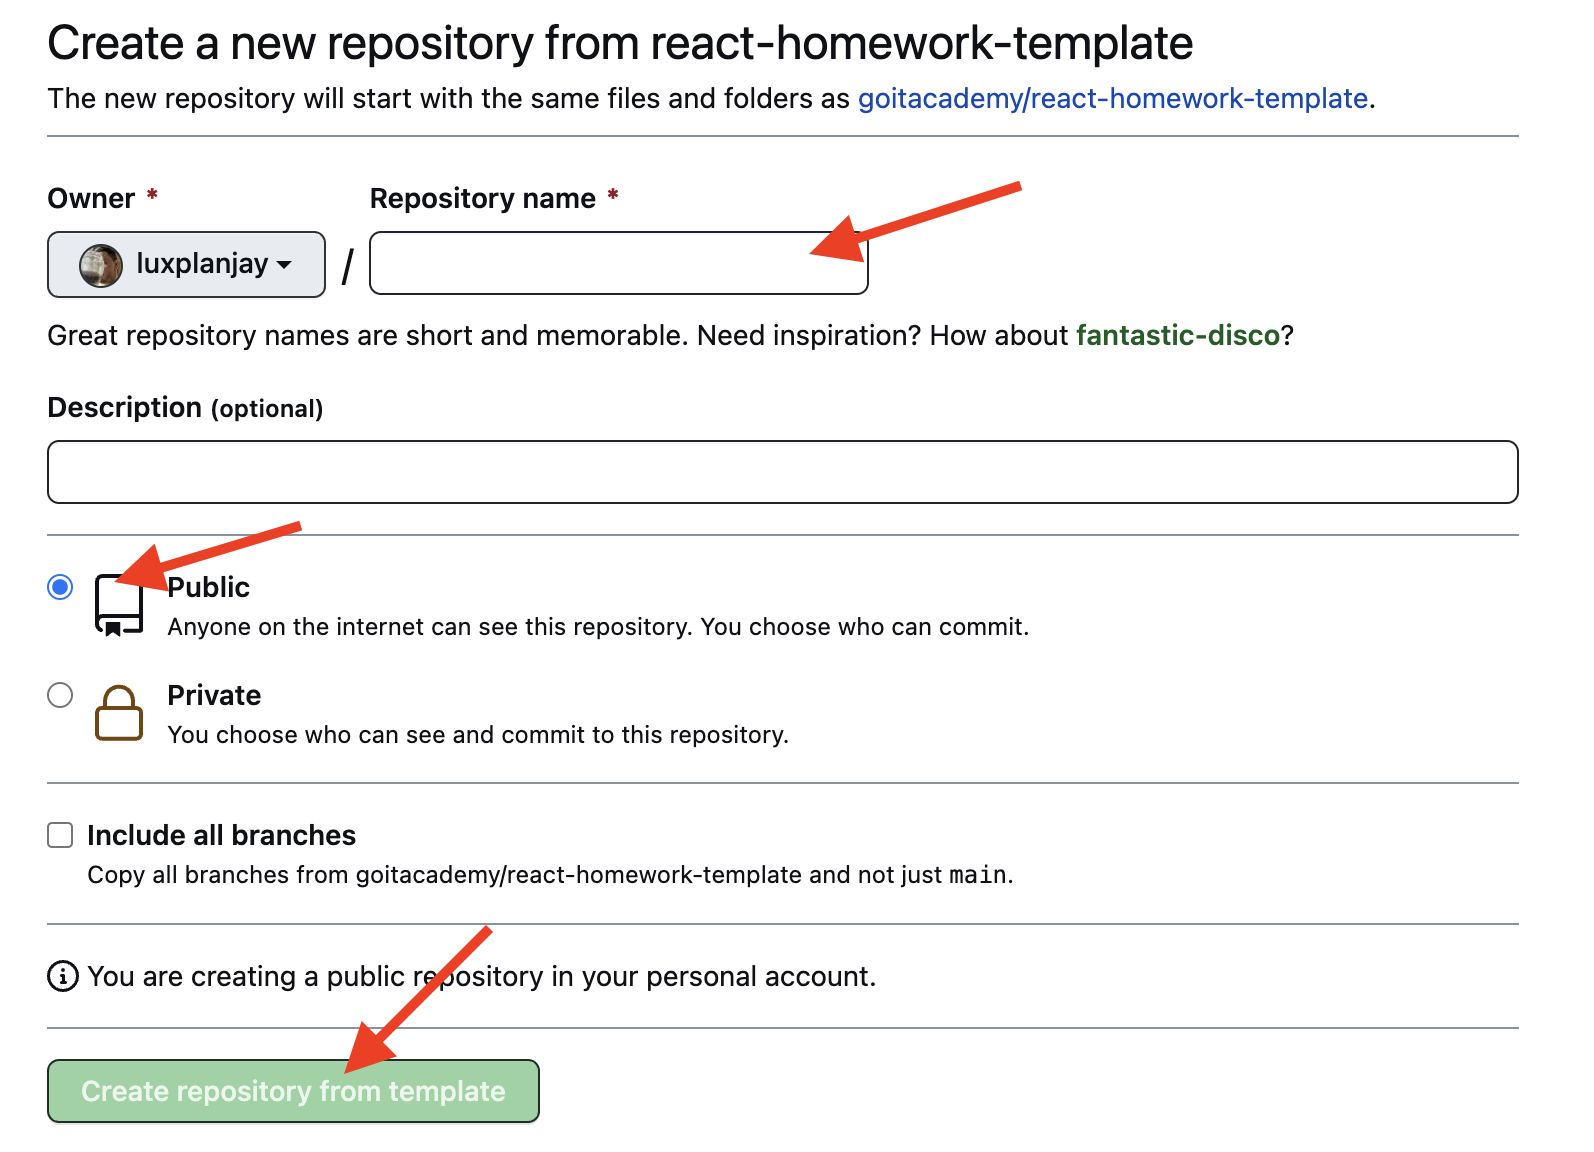
На наступному кроці відкриється сторінка створення нового репозиторію. Заповни поле
його імені, переконайся що репозиторій публічний, після чого натисни кнопку
«Create repository from template».
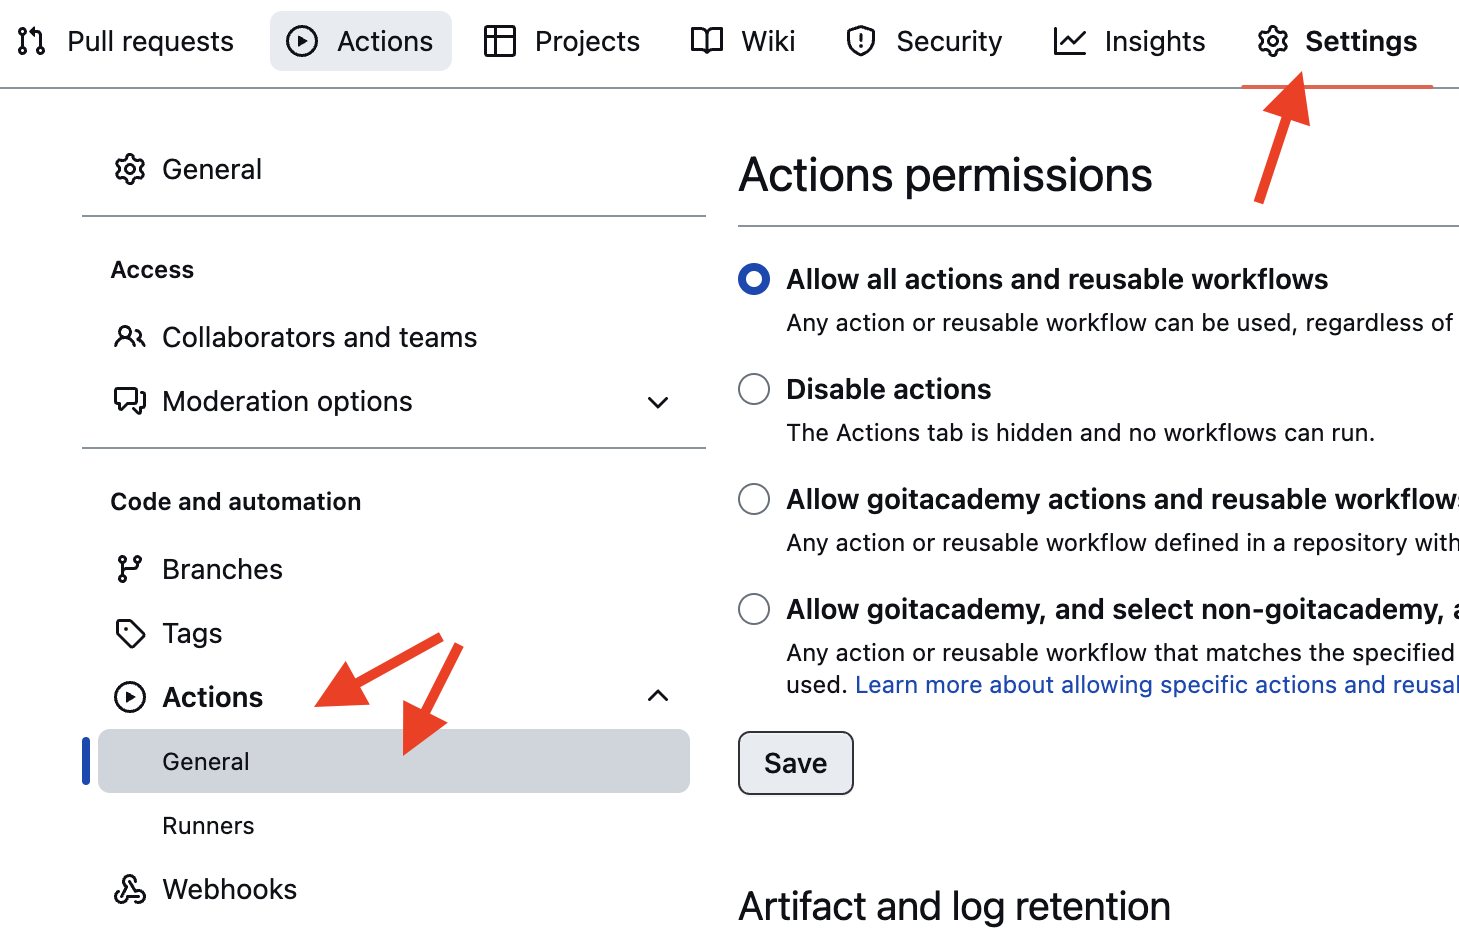
Після того як репозиторій буде створено, необхідно перейти в налаштування
створеного репозиторію на вкладку Settings > Actions > General як
показано на зображенні.
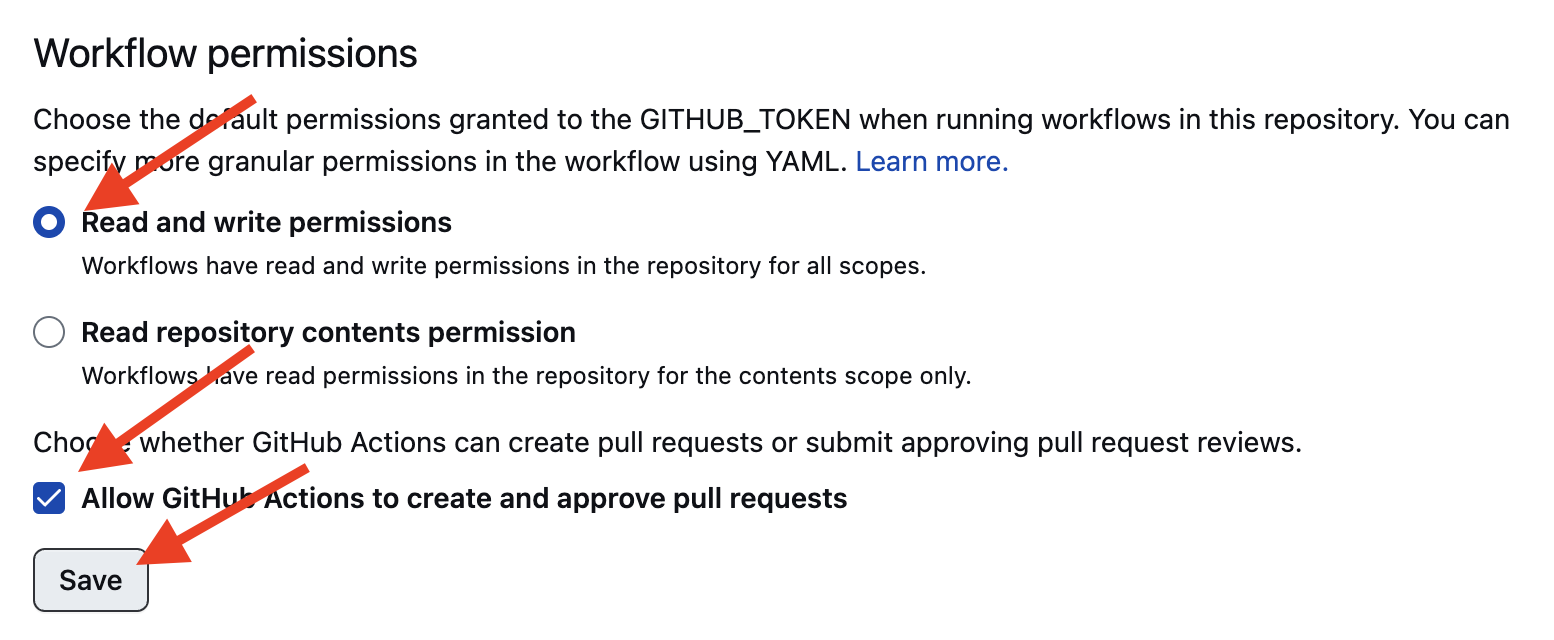
Проскроливши сторінку до самого кінця, у секції «Workflow permissions» вибери
опцію «Read and write permissions» і постав галочку в чекбоксі. Це
необхідно для автоматизації процесу деплою проєкту.
Тепер у тебе є особистий репозиторій проекту, зі структурою файлів і папок
репозиторію-шаблону. Далі працюй із ним як із будь-яким іншим особистим репозиторієм,
клонуй його собі на комп’ютер, пиши код, роби комміти і відправляй їх на
GitHub.
Підготовка до роботи
Переконайся що на комп’ютері встановлено LTS-версія Node.js.
Завантаж і встанови її якщо необхідно.
Встанови базові залежності проєкту командою npm install.
Запусти режим розробки, виконавши команду npm start.
Перейди в браузері за адресою http://localhost:3000.
Ця сторінка буде автоматично перезавантажуватися після збереження змін у файлах проєкту.
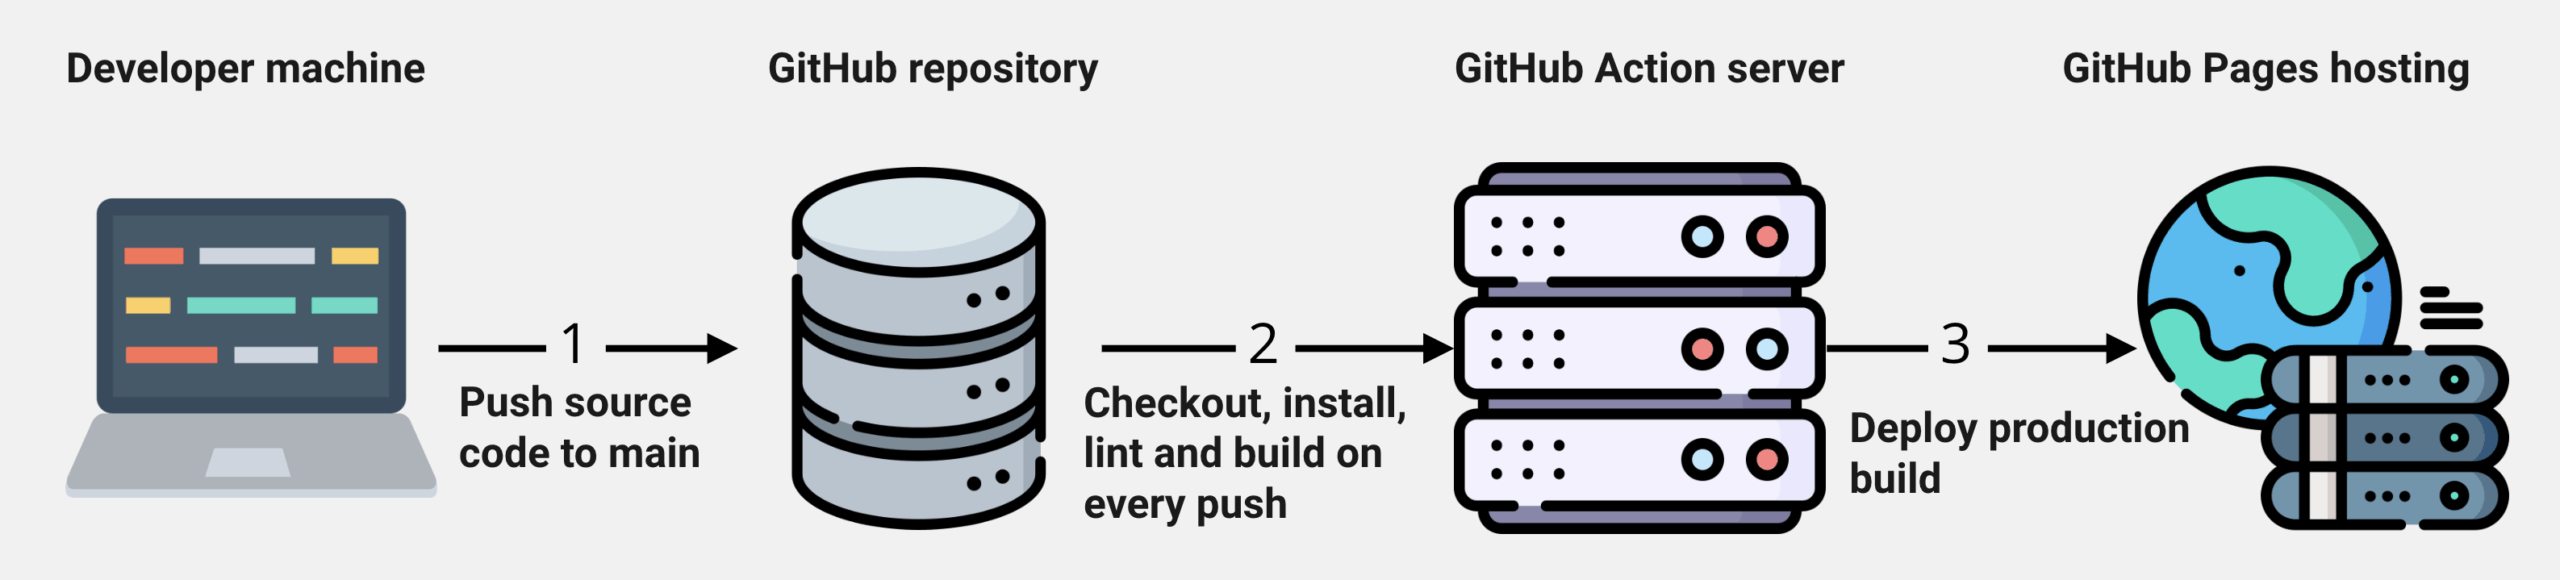
Деплой
Продакшн версія проєкту буде автоматично проходити лінтинг, збиратися і
деплоїтися на GitHub Pages, у гілку gh-pages, щоразу, коли оновлюється
гілка main. Наприклад, після прямого пушу або прийнятого пул-реквесту. Для цього
необхідно у файлі package.json відредагувати поле homepage, замінивши
your_username і your_repo_name на свої, і відправити зміни на GitHub.
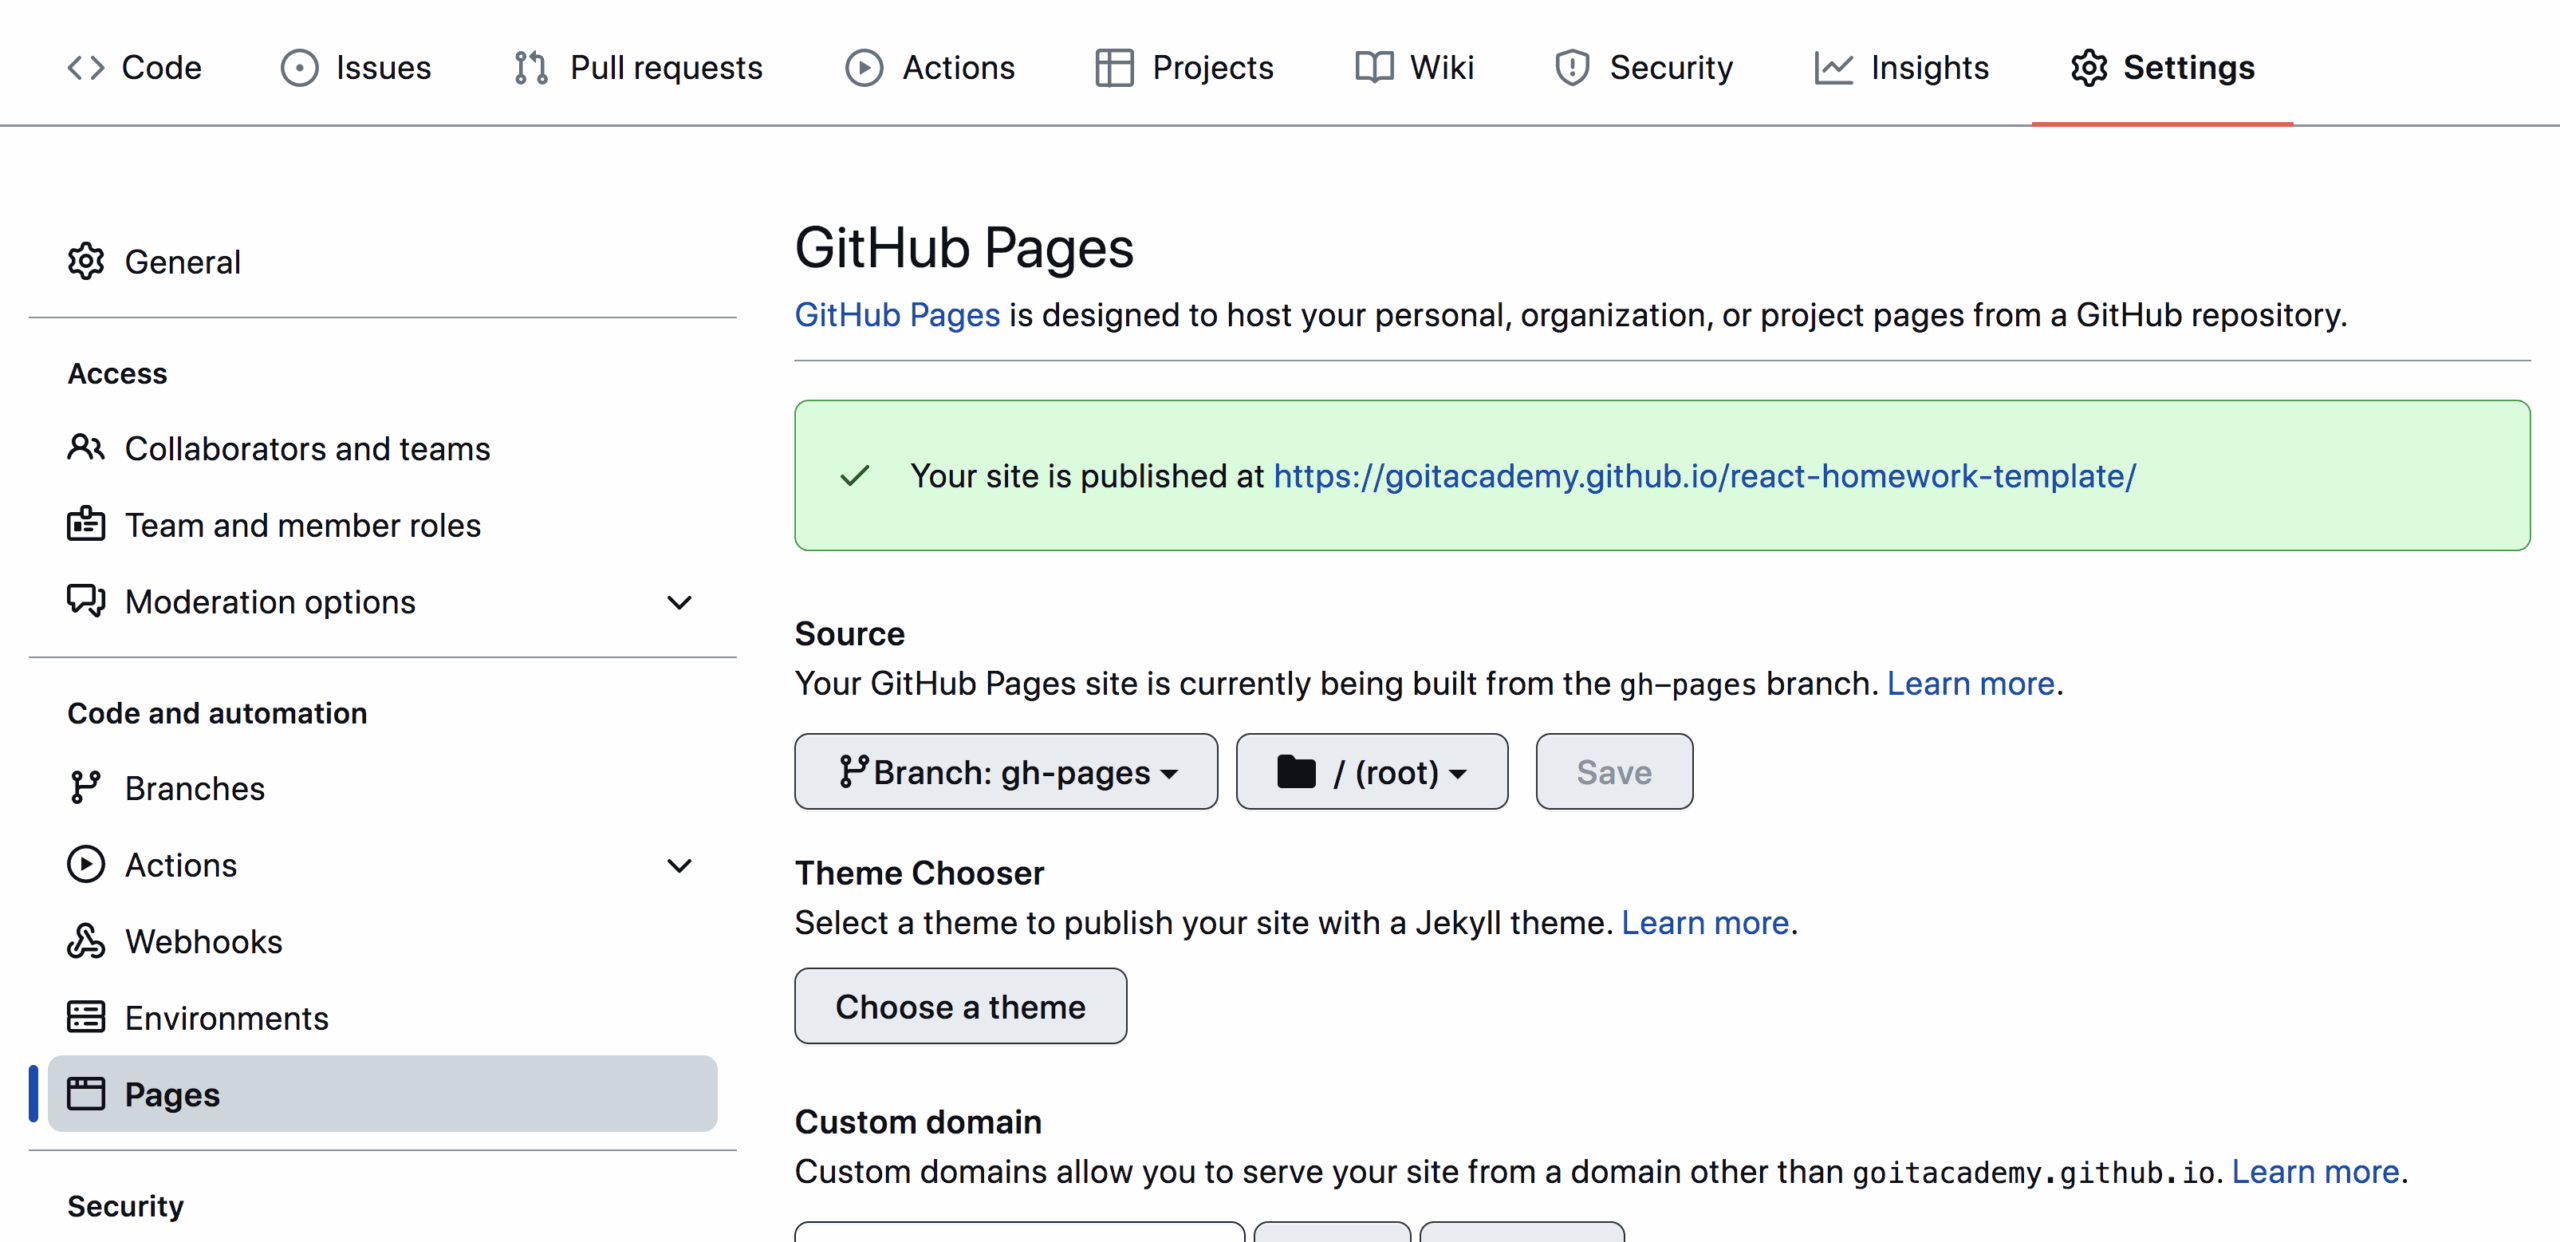
Далі необхідно зайти в налаштування GitHub-репозиторію (Settings > Pages) і
виставити роздачу продакшн-версії файлів із папки /root гілки gh-pages, якщо
це не було зроблено автоматично.
Статус деплоя
Статус деплою крайнього коміту відображається іконкою біля його ідентифікатора.
Жовтий колір – виконується збірка і деплой проєкту.
Зелений колір – деплой завершився успішно.
Червоний колір – під час лінтингу, сборки або деплою сталася помилка.
Детальнішу інформацію про статус можна подивитися, клікнувши на іконку, і
у вікні, що випадає, перейти за посиланням Details.
Жива сторінка
Через якийсь час, зазвичай кілька хвилин, живу сторінку можна буде подивитися
за адресою, вказаною у відредагованій властивості homepage. Наприклад, ось
посилання на живу версію для цього репозиторію
https://goitacademy.github.io/react-homework-template.
Якщо відкривається порожня сторінка, переконайся, що у вкладці Console немає помилок
пов’язаних із неправильними шляхами до CSS і JS файлів проєкту (404). Швидше
за все у тебе неправильне значення властивості homepage у файлі package.json.
Маршрутизація
Якщо додаток використовує бібліотеку react-router-dom для маршрутизації,
необхідно додатково налаштувати компонент <BrowserRouter>, передавши у пропе
basename точну назву твого репозиторію. Слеш на початку рядка обов’язковий.
Після кожного пушу в гілку main GitHub-репозиторія, запускається спеціальний
скрипт (GitHub Action) з файла .github/workflows/deploy.yml.
Усі файли репозиторію копіюються на сервер, де проект ініціалізується і
проходить лінтинг і збірку перед деплоєм.
Якщо всі кроки пройшли успішно, зібрана продакшн-версія файлів проєкту
відправляється в гілку gh-pages. В іншому випадку, в лозі виконання
скрипта буде вказано в чому проблема.
Використовуй цей репозиторій організації GoIT як шаблон для створення репозиторію
свого проєкта. Для цього натисни на кнопку «Use this template» і вибери опцію
«Create a new repository», як показано на зображенні.
На наступному кроці відкриється сторінка створення нового репозиторію. Заповни поле
його імені, переконайся що репозиторій публічний, після чого натисни кнопку
«Create repository from template».
Після того як репозиторій буде створено, необхідно перейти в налаштування
створеного репозиторію на вкладку Settings > Actions > General як
показано на зображенні.
Проскроливши сторінку до самого кінця, у секції «Workflow permissions» вибери
опцію «Read and write permissions» і постав галочку в чекбоксі. Це
необхідно для автоматизації процесу деплою проєкту.
Тепер у тебе є особистий репозиторій проекту, зі структурою файлів і папок
репозиторію-шаблону. Далі працюй із ним як із будь-яким іншим особистим репозиторієм,
клонуй його собі на комп’ютер, пиши код, роби комміти і відправляй їх на
GitHub.
Підготовка до роботи
Переконайся що на комп’ютері встановлено LTS-версія Node.js.
Завантаж і встанови її якщо необхідно.
Встанови базові залежності проєкту командою npm install.
Запусти режим розробки, виконавши команду npm start.
Перейди в браузері за адресою http://localhost:3000.
Ця сторінка буде автоматично перезавантажуватися після збереження змін у файлах проєкту.
Деплой
Продакшн версія проєкту буде автоматично проходити лінтинг, збиратися і
деплоїтися на GitHub Pages, у гілку gh-pages, щоразу, коли оновлюється
гілка main. Наприклад, після прямого пушу або прийнятого пул-реквесту. Для цього
необхідно у файлі package.json відредагувати поле homepage, замінивши
your_username і your_repo_name на свої, і відправити зміни на GitHub.
Далі необхідно зайти в налаштування GitHub-репозиторію (Settings > Pages) і
виставити роздачу продакшн-версії файлів із папки /root гілки gh-pages, якщо
це не було зроблено автоматично.
Статус деплоя
Статус деплою крайнього коміту відображається іконкою біля його ідентифікатора.
Жовтий колір – виконується збірка і деплой проєкту.
Зелений колір – деплой завершився успішно.
Червоний колір – під час лінтингу, сборки або деплою сталася помилка.
Детальнішу інформацію про статус можна подивитися, клікнувши на іконку, і
у вікні, що випадає, перейти за посиланням Details.
Жива сторінка
Через якийсь час, зазвичай кілька хвилин, живу сторінку можна буде подивитися
за адресою, вказаною у відредагованій властивості homepage. Наприклад, ось
посилання на живу версію для цього репозиторію
https://goitacademy.github.io/react-homework-template.
Якщо відкривається порожня сторінка, переконайся, що у вкладці Console немає помилок
пов’язаних із неправильними шляхами до CSS і JS файлів проєкту (404). Швидше
за все у тебе неправильне значення властивості homepage у файлі package.json.
Маршрутизація
Якщо додаток використовує бібліотеку react-router-dom для маршрутизації,
необхідно додатково налаштувати компонент <BrowserRouter>, передавши у пропе
basename точну назву твого репозиторію. Слеш на початку рядка обов’язковий.
Після кожного пушу в гілку main GitHub-репозиторія, запускається спеціальний
скрипт (GitHub Action) з файла .github/workflows/deploy.yml.
Усі файли репозиторію копіюються на сервер, де проект ініціалізується і
проходить лінтинг і збірку перед деплоєм.
Якщо всі кроки пройшли успішно, зібрана продакшн-версія файлів проєкту
відправляється в гілку gh-pages. В іншому випадку, в лозі виконання
скрипта буде вказано в чому проблема.
-or- Microsoft Game Development Kit with Xbox Extensions (GDKX)
Privacy Statement
When compiling and running a sample, the file name of the sample executable will be sent to Microsoft to help track sample usage. To opt-out of this data collection, you can remove the block of code in Main.cpp labeled Sample Usage Telemetry.
This project may contain trademarks or logos for projects, products, or services. Authorized use of Microsoft trademarks or logos is subject to and must follow Microsoft’s Trademark & Brand Guidelines. Use of Microsoft trademarks or logos in modified versions of this project must not cause confusion or imply Microsoft sponsorship. Any use of third-party trademarks or logos are subject to those third-party’s policies.
This repo provides packages and development shells for
working with Gleam projects using Nix.
Usage
# running `gleam --version`
$ nix run github:vic/gleam-nix -- --version
gleam 1.9.0

# you can also override to use any gleam revision (commit,branch,release) and any rust version (prefer stable releases)
$ nix run github:vic/gleam-nix --override-input gleam github:gleam-lang/gleam/v1.9.1 --override-input rust-manifest file+https://static.rust-lang.org/dist/channel-rust-1.85.0.toml -- --version
gleam 1.9.1
If you are creating a new awesome project with Gleam,
this flake can provide you with a development environment
containing gleam and two of its run-times: erlang and nodejs.
$ nix run github:vic/gleam-nix -- new my-new-project
$ cd my-new-project
$ nix develop github:vic/gleam-nix -c $SHELL -l
If you are using direnv, create an .envrc file with
the following content:
# .envrc
use flake github:vic/gleam-nix
Hack on Gleam
If you are willing to contribute to Gleam development,
this flake can provide you an entire development environment
ready for you to focus only on making Gleam awesome.
Try not to change gleam pinned release unless it no longer builds with
the current Rust toolchain. In that case, update the rust-manifest input and the gleam pinned release. And please update Historic Builds with the range of known versions able to build.
FAQ
How is this different from the gleam package provided by nixpkgs.
This flake existed before we had an official gleam package on nixpkgs.
And most people would indeed only use that package.
However, for gleam hackers, this flake would be better suited since
it provides a development shell with dependencies based on Gleam’s source.
Also people trying to use a more recent or experimental version of Gleam
will benefit from this flake.
I’m getting a option 'allow-import-from-derivation' is disabled error.
Old versions of this repo bundled a Cargo.nix file containing all of Gleam’s
dependencies in order for nix to know how to fetch them and how to build the
Gleam cargo workspace.
However, one inconvenience of this was that the Cargo.nix file was tied to
a particular Gleam revision, and since Gleam is improving quite rapidly, it
was not uncommon to find the Cargo.nix file on this repo being outdated with
respect to Gleam’s source code.
People had to regularly re-create the Cargo.nix file with cargo2nix.
Now, instead of using cargo2nix, we use crate2nix which allows us to generate
the Cargo.nix file as part of the build. Thus not requiring we to bundle it
on this repo, and prevent it from getting outdated. One advantage is that using --override-input gleam <some-gleam-url> will automatically generate Cargo.nix
for that particular gleam revision.
This repo will only need to be updated when we have to bump the rust toolchain
as expected by Gleam.
On the other side, by not bundling a Cargo.nix, building with crate2nix
requires the allow-import-from-derivation nix option to be enabled.
This flake enables this option as part of flake.nix and will
be activated if you are listed as trusted-user in your nix.conf or
provide --accept-flake-config explicitly.
This is the documentation for the new website called Chapull Market, which was created on spring term of
2014 [Bilgi University Computer Science Web Project]
This website is designed on purpose to help people recycle their items through a web site that users. Recycling in this project context means exchange of items. Users have to register the website in order to see information on the web site and recycle. There is a table which shows all items are available to recycle on home page. Users see information about any items such as photograph, model, state, status etc. then users should press more button or click the item’s photo which redirects the users to item detail page. Users also create their own items for recycling the other users items. Each item of users are shown on their profile page. Users can give offer to all other users’ items with recycling own items. Each offers of items are shown on profile page and users can accept or reject the offers of for each own items. The following three sections discuss the design goals, maintaining the site, examples of the pages and functions of the codes.
Our main tool for building the new site has been Django.
Django is a high-level Python Web framework that encourages rapid development and clean, pragmatic design. Developed in 2003 by a fast moving online news operation, Django was designed to handle two challenges: the intensive deadlines of a newsroom and the stringent requirements of the experienced Web developers who wrote it. It lets you build high performing, elegant Web applications quickly. Django is an Open Source web framework that enables you to build clean and feature rich web applications with minimal time and effort.
Django promotes the use of human readable urls.
Django offers the flexibility to customize pieces of the web site to suit the needs of the project at hand instead of relying on pre-built applications. Using Django, we can customize that widget to display what we want, how we want.
Because of the way that Django is developed and installed, you have a greater level of security when you compare it to a website that was developed with PHP for example. This is because the source code, excluding the html and css files, for your web site are not directly exposed to the Internet and your viewers online. In most cases the web pages are dynamically generated and then sent to your browser using templates.
The templates that we develop are for creating a look and feel specific to your website. We are not just filling in information in a template that we downloaded off of another site. Therefore you are guaranteed that the site we develop for you will look unique. This is one of the big features of Django.
Using this template structure makes it much easier for us to add additional pages as well as make site wide, visual or code changes. The template structure also ensures that your website will have a consistent look and feel throughout the entire site.
Angular 17 and .Net 8 Jwt Authentication Application
This is an Angular 17 standalone application that demonstrates user authentication, role-based access control, and token refresh using CanActivateFn for guards and HttpInterceptorFn for interceptors.
Features
User login and registration
Auth guard for protecting routes
Role guard for role-based access control
Refresh token mechanism to maintain user sessions
Standalone Angular configuration without app.module.ts
Prerequisites
Node.js (v14 or higher recommended)
Angular CLI (v17 or higher)
Getting Started
Installation
Clone the repository:
git clone https://github.com/onurtpl/Dotnet8-Angular17-JWT-Authentication-Authorization.git
cd Dotnet8-Angular17-JWT-Authentication-Authorization/frontend
npm install
Run backend:
  cd Dotnet8-Angular17-JWT-Authentication-Authorization/backend/API
  dotnet watch run
Run frontend:
  cd Dotnet8-Angular17-JWT-Authentication-Authorization/frontend
  ng serve -o