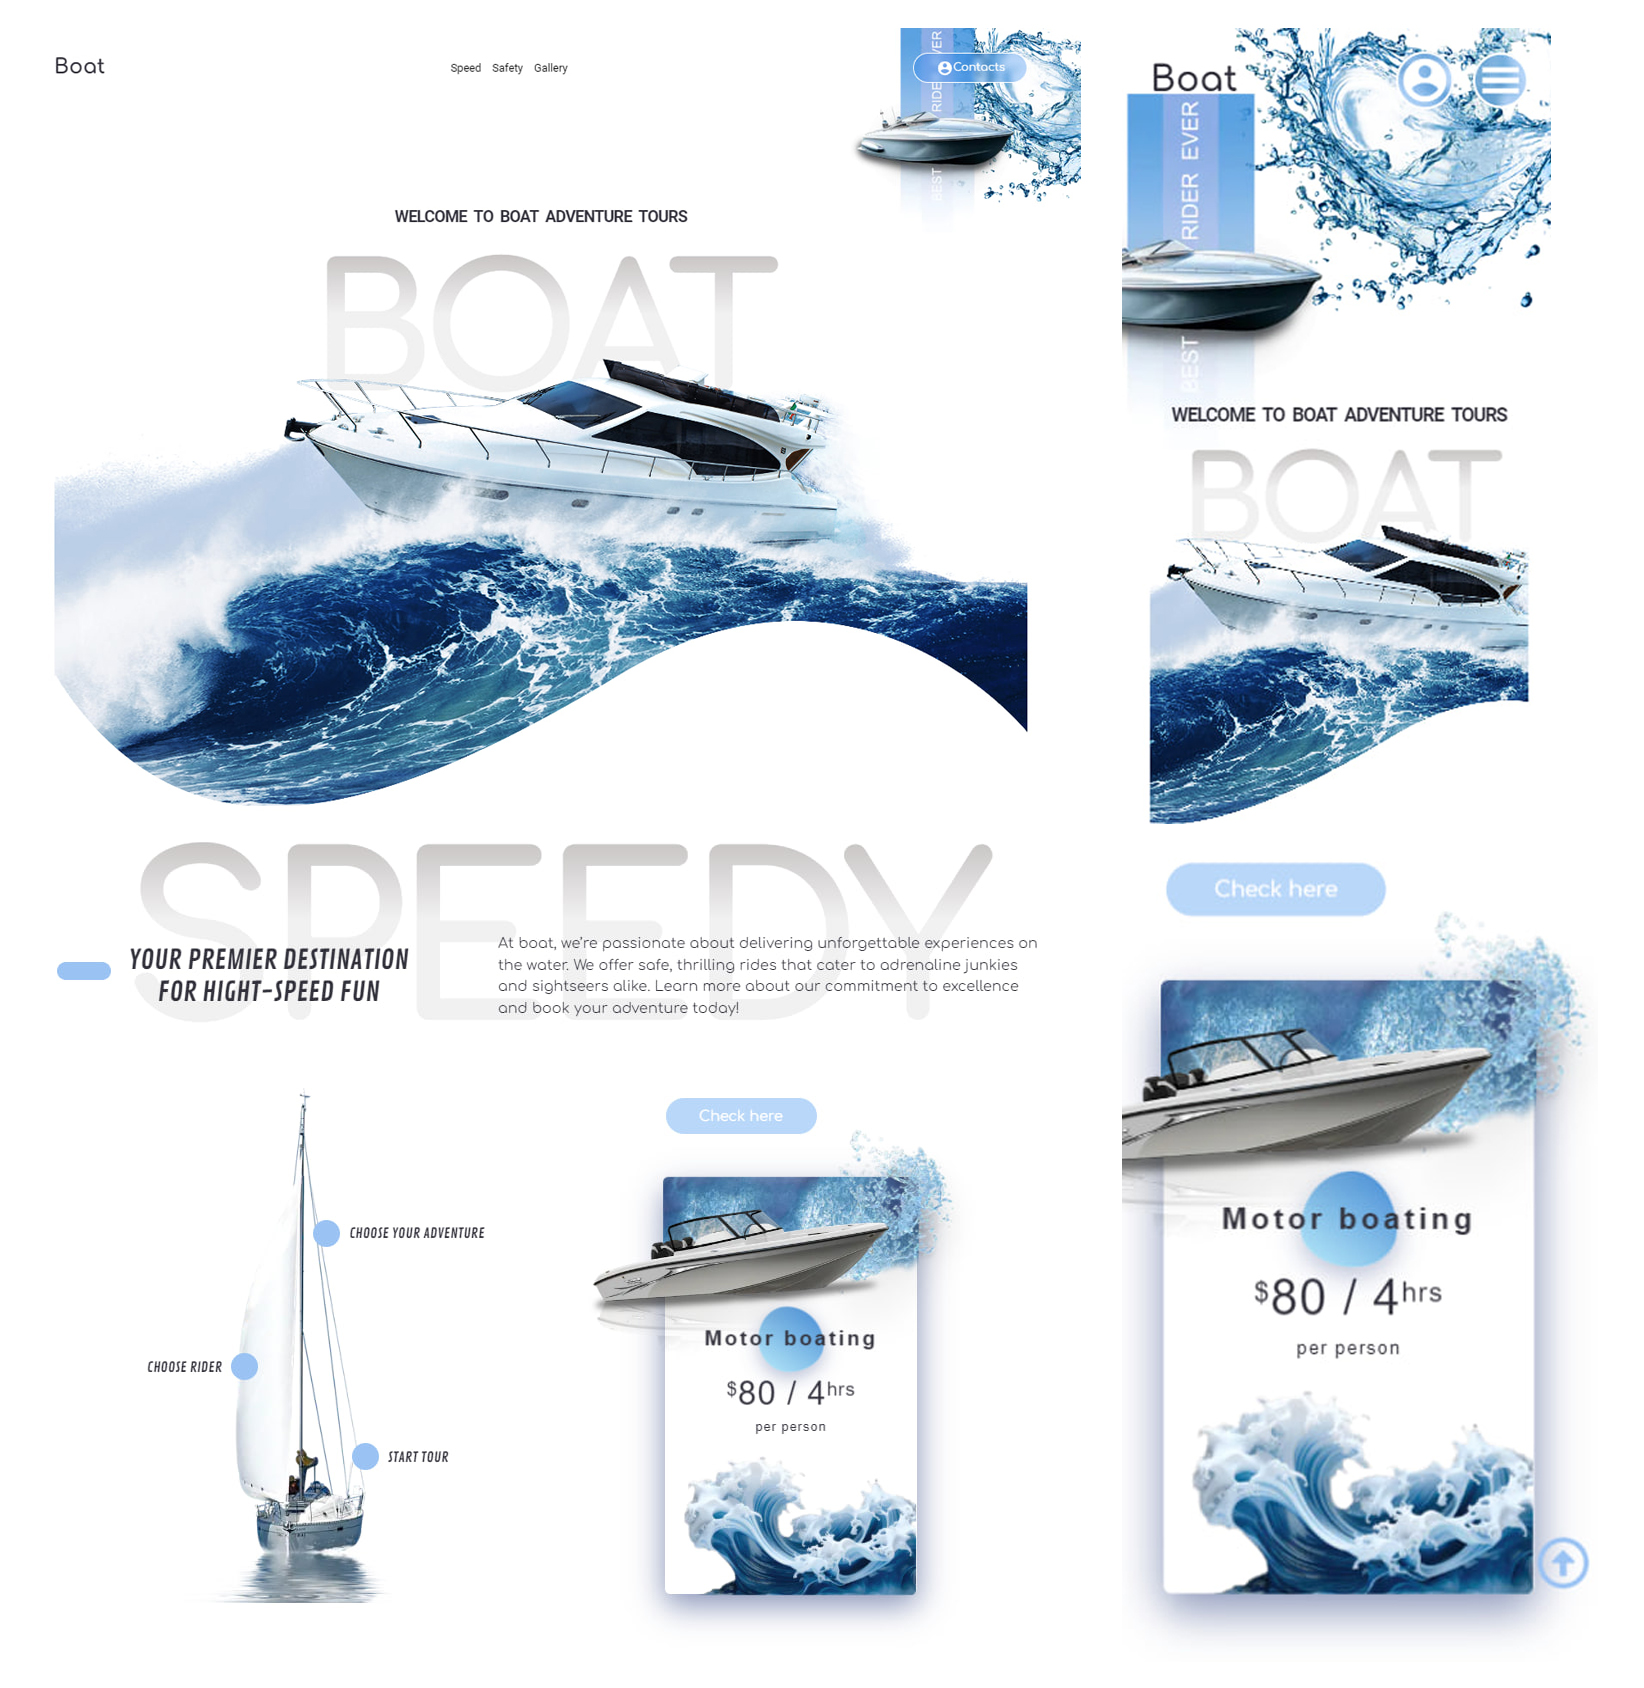
This project is a single-page landing site dedicated to promoting boat trips, yachting, and rental services. The site is designed to provide a visually appealing and informative experience for users interested in maritime adventures. Below is a detailed description of each section of the website.
The app uses react-scroll for navigation. The available sections are:
Home – Welcome section includes:
Navigation: A responsive navigation menu that adapts seamlessly to mobile devices, ensuring easy access to all sections of the site.
Main Banner: Features an eye-catching image of a motorboat riding the waves of the ocean, setting the tone for the adventurous theme of the site.
Speedy – includes:
Yacht Display: Showcases images of various yachts, highlighting different options available for rent.
Animated Card: An engaging, animated card providing detailed information and options for renting a vessel, making the user experience interactive and dynamic.
Safety – includes:
Importance of Safety: This section emphasizes the critical importance of safety while boating, ensuring users understand the measures taken to protect them during their maritime adventures.
Gallery – includes:
Photo Slider: A gallery presented in a slider format, displaying beautiful and captivating images of boats, yachts, and ocean scenes to inspire and attract potential customers.
Contact – includes:
Contact Form: A simple and effective form for users to get in touch, ask questions, or request further information about the services offered.
Features
Implemented responsiveness and mobile menu for better UI.
Getting Started
To run the application locally, follow these steps:
Clone the repository: git clone https://github.com/Inna-Mykytiuk/boat.git
Install dependencies: npm install
Run the app: npm run dev
Open http://localhost:3000 in your browser (Note: the port may be changed if 3000 port is occupied by another website).
Technologies Used
Next.js:
Our website is powered by Next.js, providing a seamless and efficient user experience. It ensures fast loading times and smooth navigation.
Tailwind CSS:
Used for styling, offering a highly customizable and utility-first approach to CSS that ensures responsive and attractive design.
React-Scroll:
Enhancing the scrolling experience on our website, React-Scroll adds a touch of sophistication, allowing users to glide smoothly between sections.
TypeScript:
Implemented for static type checking, enhancing code quality and reducing errors during development.
Framer Motion:
Our project incorporates Framer Motion to bring life to the user interface with stunning animations. Framer Motion is a React library that simplifies the creation of smooth and interactive animations, adding a layer of dynamism to various elements on our website.
Swiper:
Used for creating the responsive, touch-friendly photo slider in the Gallery section, providing a seamless viewing experience on all devices..
Summary
This landing page effectively combines visual appeal with functional design to create an engaging user experience for individuals interested in boat trips and yacht rentals. By leveraging modern web development technologies, the site ensures high performance, responsiveness, and an interactive user interface. The strategic use of animations, smooth scrolling, and an intuitive navigation system further enhances the overall experience, making it easy for users to explore the services offered and get in touch for more information.
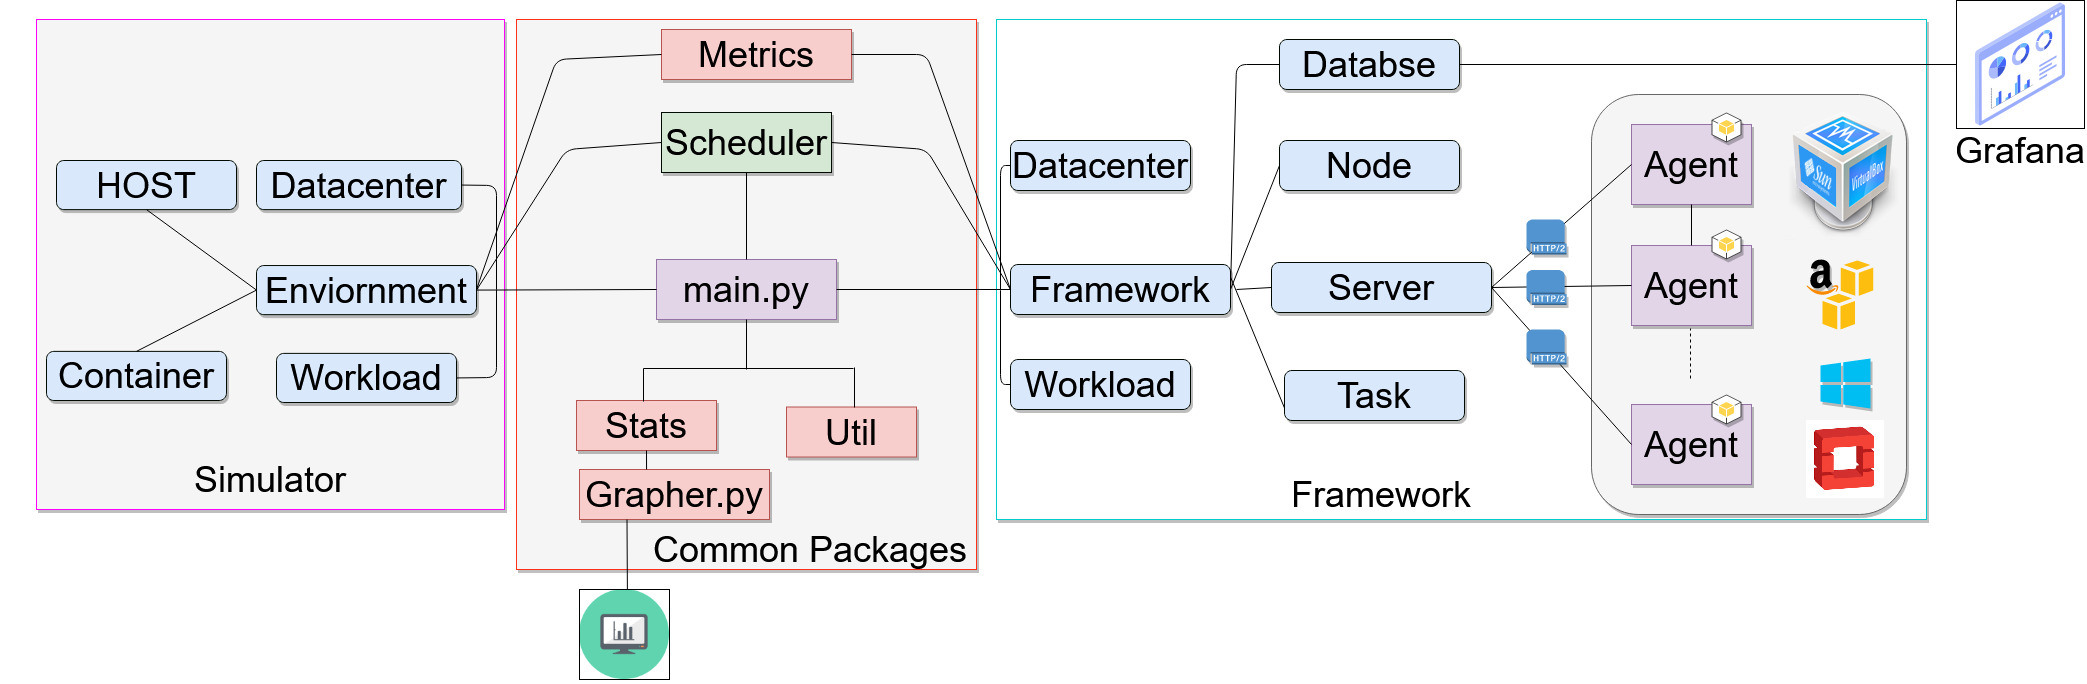
COSCO is an AI based coupled-simulation and container orchestration framework for integrated Edge, Fog and Cloud Computing Environments. It’s a simple python based software solution, where academics or practitioners can develop, simulate, test and deploy their scheduling policies. Further, this repo presents a novel gradient-based optimization strategy using deep neural networks as surrogate functions and co-simulations to facilitate decision making. A tutorial of the COSCO framework was presented at the International Conference of Performance Engineering (ICPE) 2022. Recording available here.
Advantages of COSCO
Hassle free development of AI based scheduling algorithms in integrated edge, fog and cloud infrastructures.
Provides seamless integration of scheduling policies with simulated back-end for enhanced decision making.
Supports container migration physical deployments (not supported by other frameworks) using CRIU utility.
Multiple deployment support as per needs of the developers. (Vagrant VM testbed, VLAN Fog environment, Cloud based deployment using Azure/AWS/OpenStack)
Equipped with a smart real-time graph generation of utilization metrics using InfluxDB and Grafana.
Real time metrics monitoring, logging and consolidated graph generation using custom Stats logger.
The basic architecture of COSCO has two main packages: Simulator: It’s a discrete event simulator and runs in a standalone system. Framework: It’s a kind of tool to test the scheduling algorithms in a physical(real time) fog/cloud environment with real world applications.
Our main COSCO work uses the Bitbrains and DeFog workloads. An extended work, MCDS (see workflow branch), accepted in IEEE TPDS uses scientific workflows. Check paper and code.
Novel Scheduling Algorithms
We present two novel algorithms in this work: GOBI and GOBI*. GOBI uses a neural network as a surrogate model and gradient based optimization using backpropagation of gradients to input. With advances like cosine annealing and momentum allow us to converge to an optima quickly. Moreover, GOBI* leverages a coupled simulation engine like a digital-twin to further improve the surrogate accuracy and subsequently the scheduling decisions. Experiments conducted using real-world data on fog applications using the GOBI and GOBI* methods, show a significant improvement in terms of energy consumption, response time, Service Level Objective and scheduling time by up to 15, 40, 4, and 82 percent respectively when compared to the state-of-the-art algorithms.
Supplementary video
A detailed course on using the COSCO framework for deep learning based scheduling (deep surrogate optimization and co-simulation) in fog environments is available as a youtube playlist.
Quick Start Guide
To run the COSCO framework, install required packages using
python3 install.py
To run the code with the required scheduler, modify line 106 of main.py to one of the several options including LRMMTR, RF, RL, RM, Random, RLRMMTR, TMCR, TMMR, TMMTR, GA, GOBI.
You can directly run tests on the results using a Gitpod Workspace without needing to install anything on your local machine. Click “Open in Gitpod” below and test the code by running python3 main.py.
Wiki
Access the wiki for detailed installation instructions, implementing a custom scheduler and replication of results. All execution traces and training data is available at Zenodo under CC License.
Our work is published in IEEE TPDS journal. Cite using the following bibtex entry.
@article{tuli2021cosco,
  author={Tuli, Shreshth and Poojara, Shivananda R. and Srirama, Satish N. and Casale, Giuliano and Jennings, Nicholas R.},
  journal={IEEE Transactions on Parallel and Distributed Systems},
  title={{COSCO: Container Orchestration Using Co-Simulation and Gradient Based Optimization for Fog Computing Environments}},
  year={2022},
  volume={33},
  number={1},
  pages={101-116},
}
License
BSD-3-Clause.
Copyright (c) 2021, Shreshth Tuli.
All rights reserved.
Call back URL in your AzureAD application would be :
https://<ArgoCD_Server_IP/URL>/api/dex/callback
I worked with GKE so still needs to work with localhost. It should work for localhost too where the IP/URL is required.
Lets run some commands now to get it work
Microsoft Connector
Following file needs to be updated:
microsoft-connector/argocd-extra.yaml
<Your Base64 Client Secret> : with your ClientSecret created in AzureAD for OIDC application
<Your Clinet/ApplicationID of Azure app> : Client/Application ID in AuzreAD OIDC Application.
<ArgoCD_Server_IP/URL> : If you port forward your application to localhost it should be localhost
If you create a nodeport type service it should be localhost:nodeport
If you create a loadbalancer it will be your loadbalancerIP
Lets first apply the file with configmap and secret changes
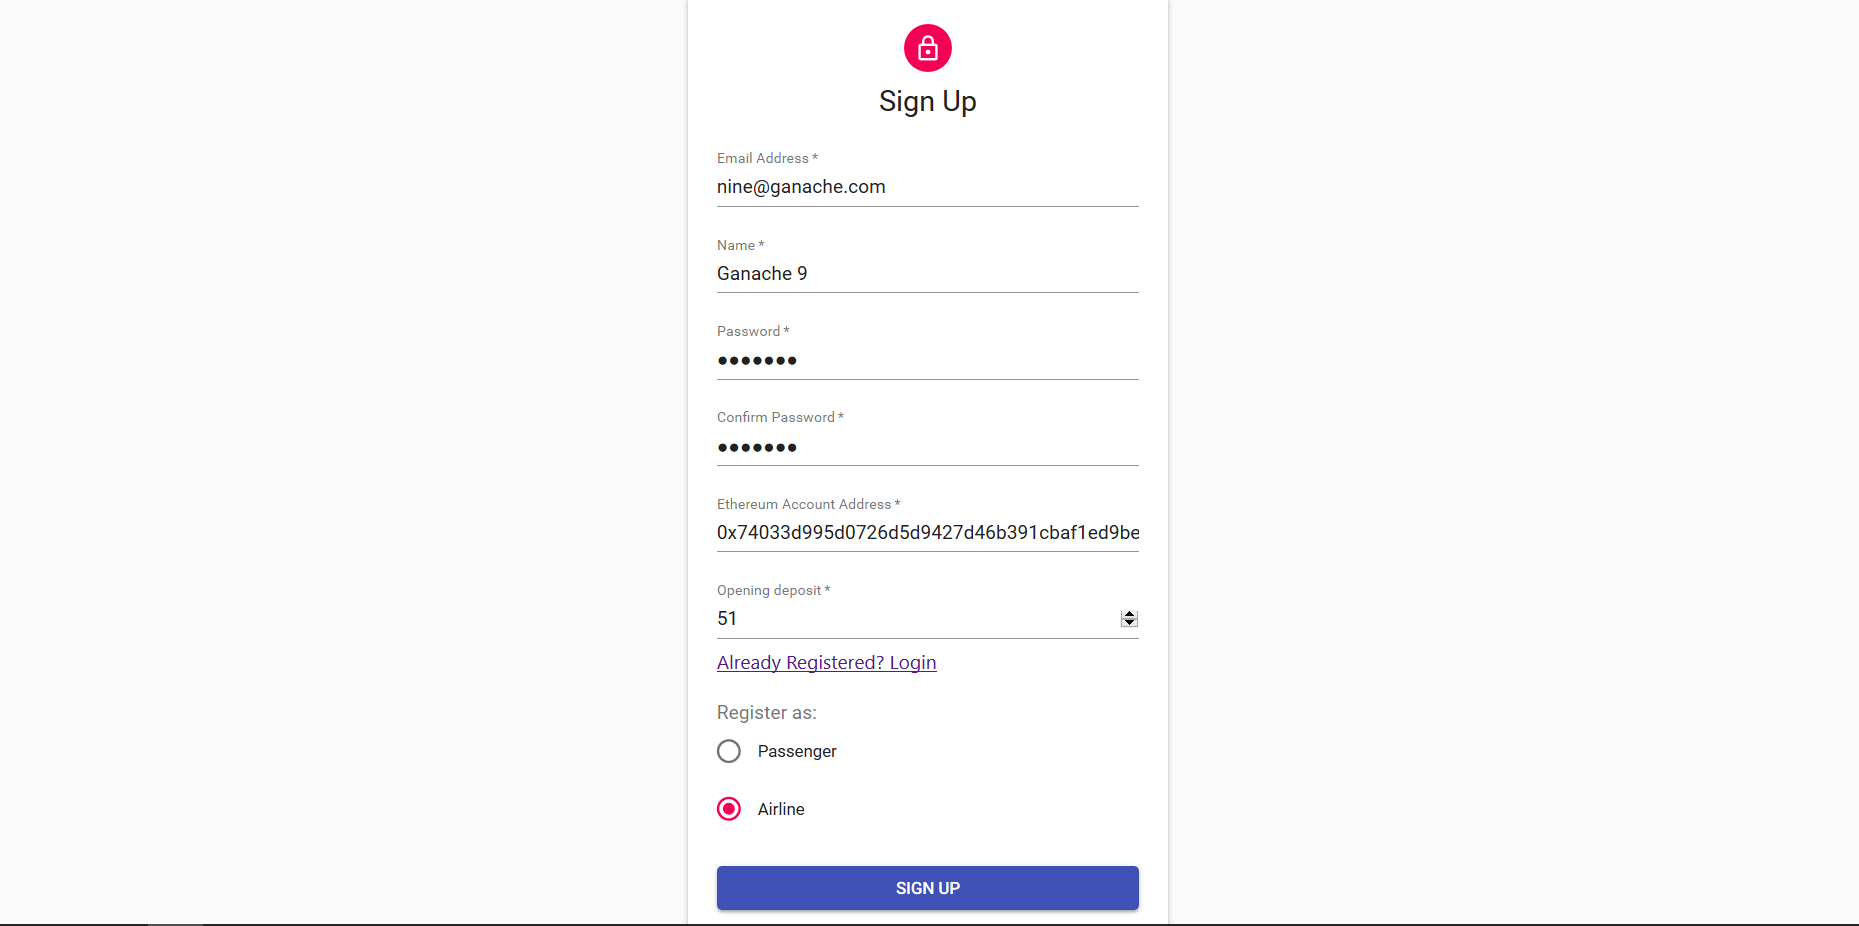
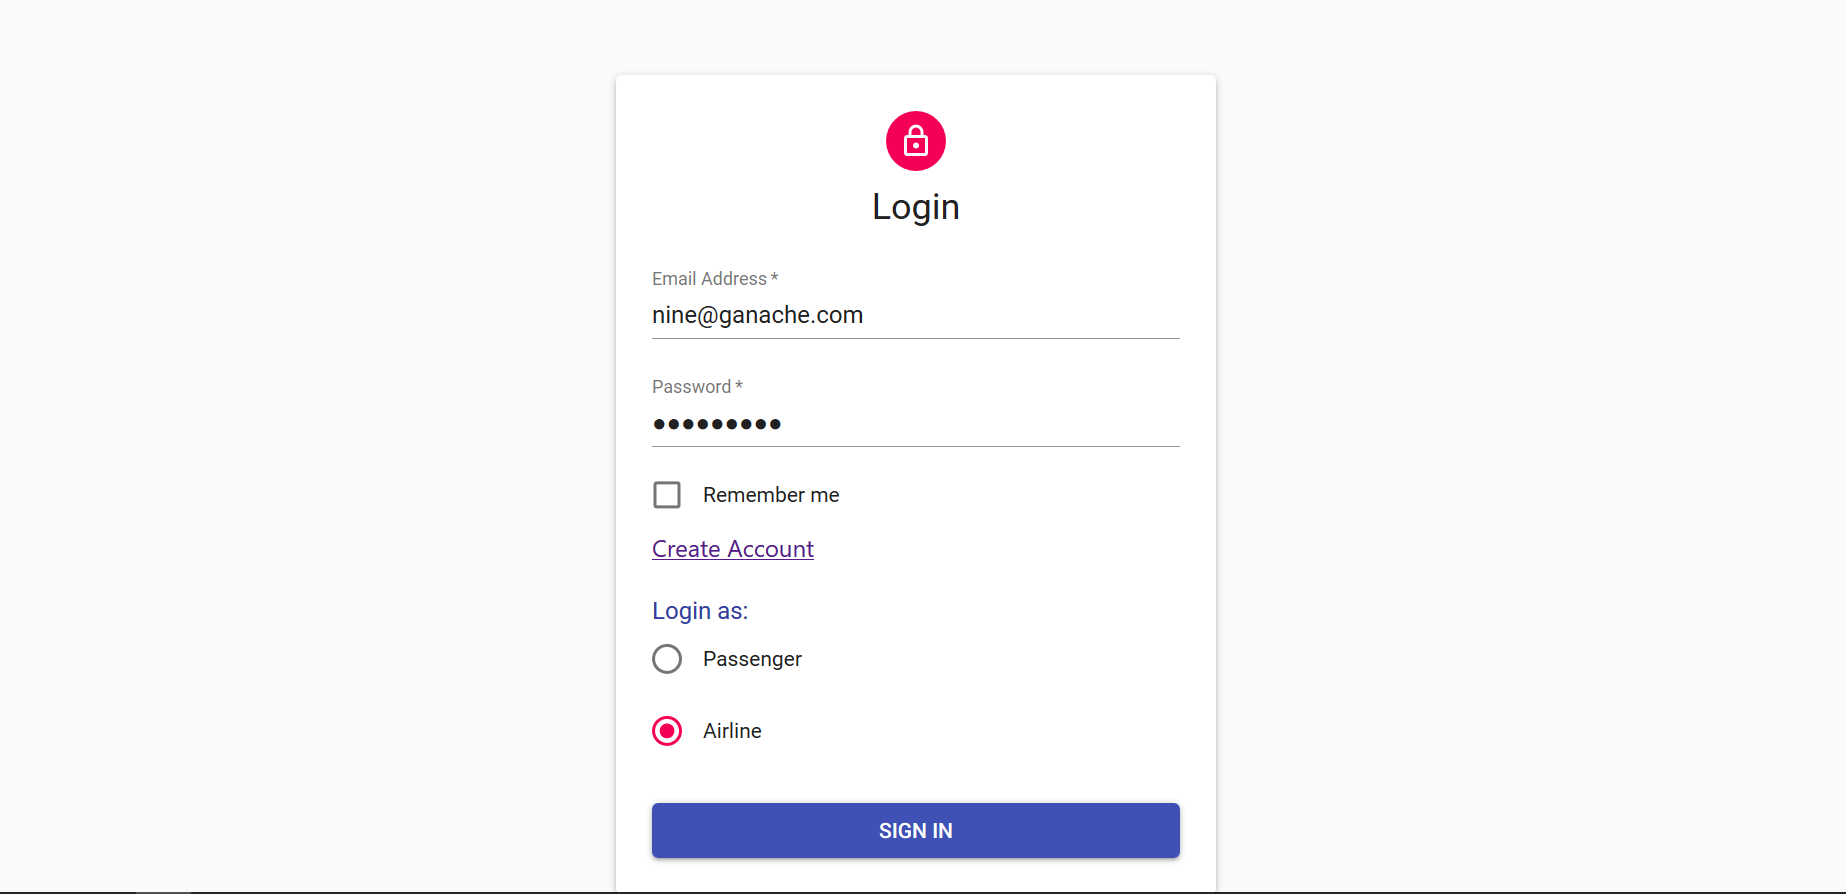
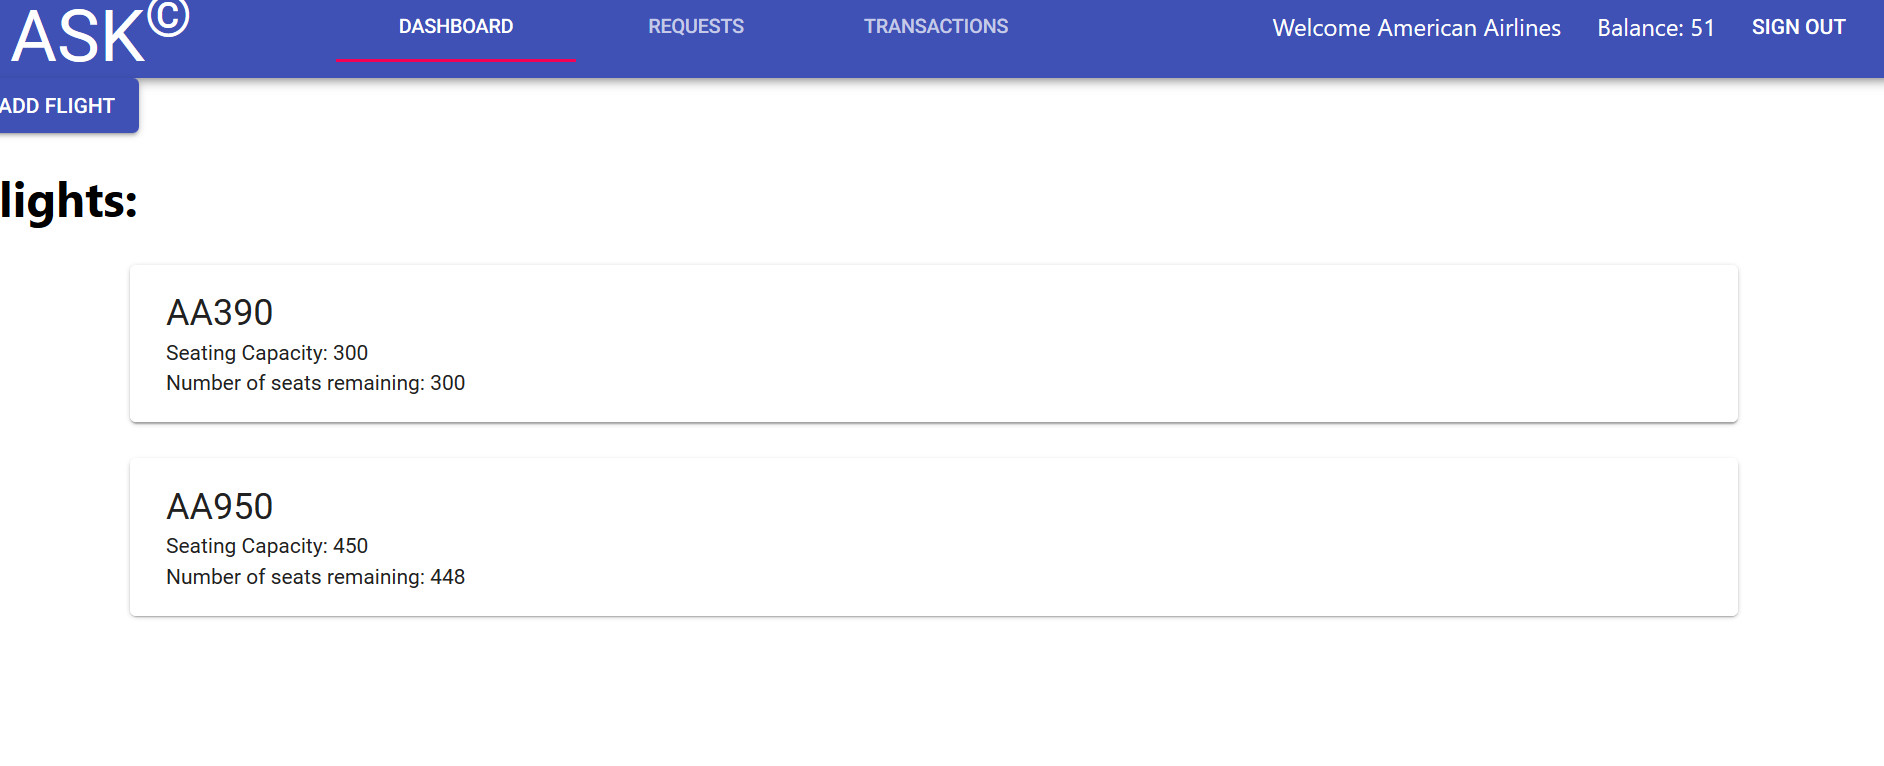
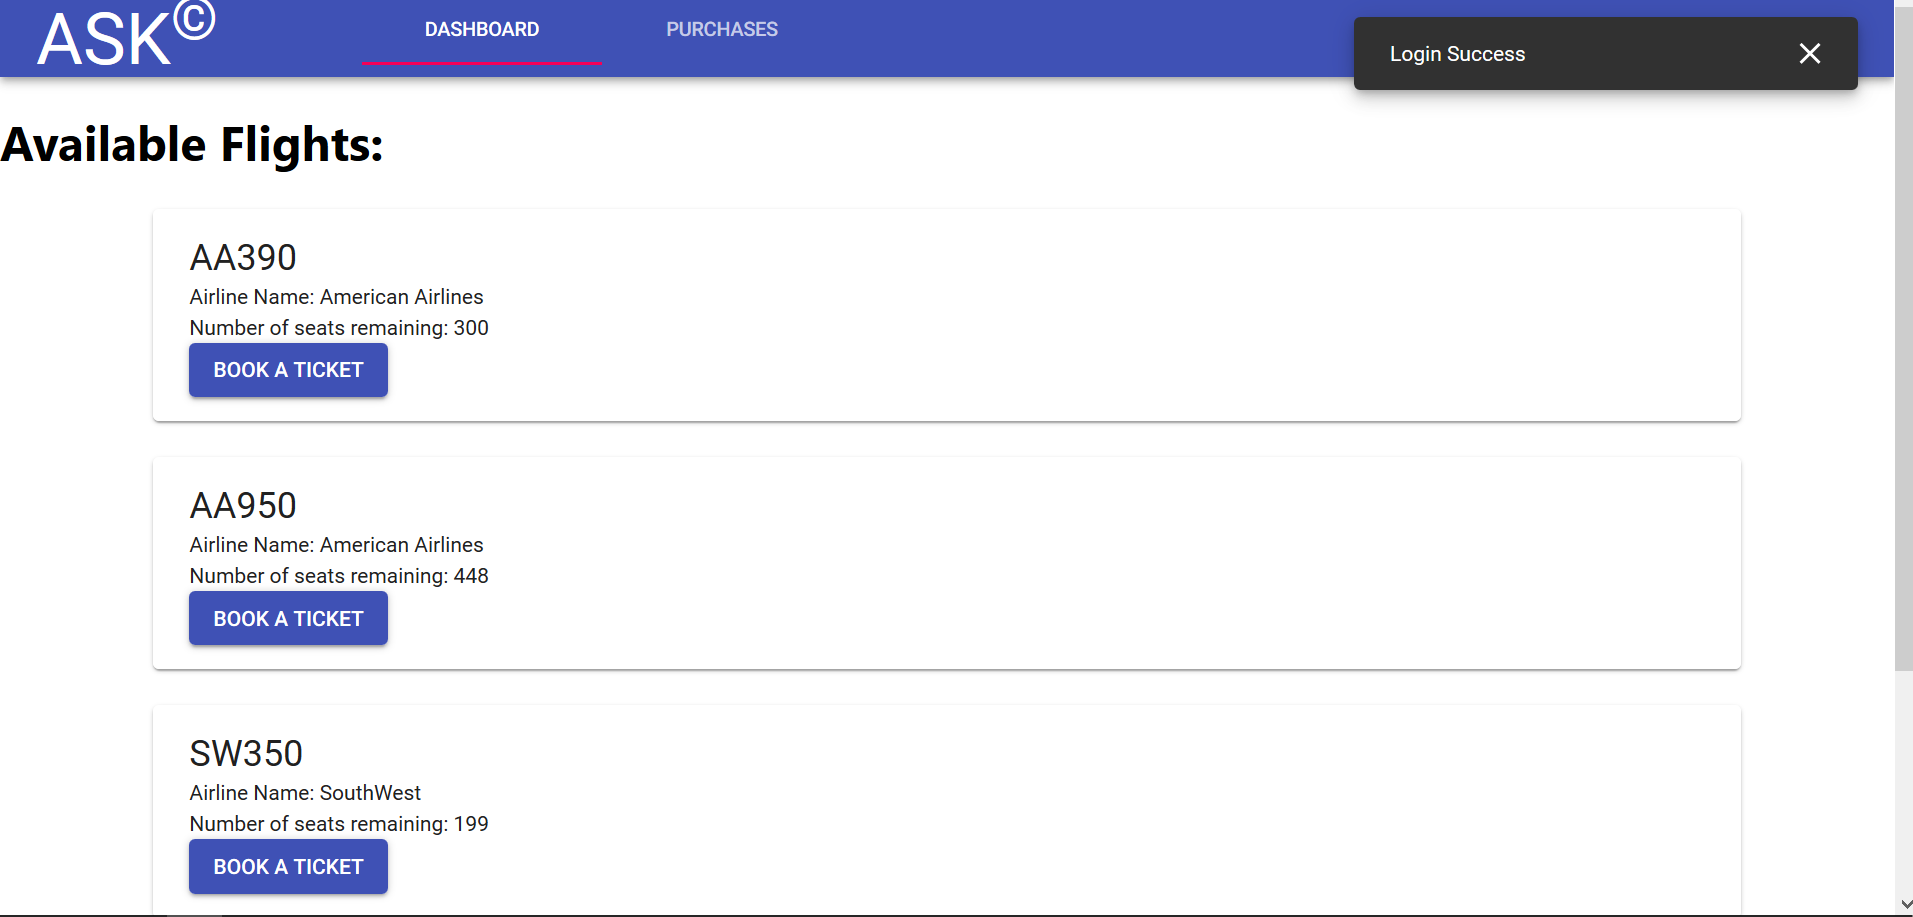
Install truffle using npm install -g truffle and install Ganache binary or CLI.
Start the ganache process using CLI or open Ganache GUI, this will start the ganache private network process.
Open a terminal and cd into the truffle-build directory and type truffle compile to compile the smart contract. Then type truffle migrate to deploy the smart contract on ganache.
Create a .env file in the root of the project. Add the following variables in the .env file:
DeskPro iOS Messenger is a Chat/AI/Messaging product. You can embed a “widget” directly into native app, so that enables end-users to use the product. Similar implementation for Android.
Requirements
iOS 11.0+
Swift 5.7+
Xcode 14.0+
Installation
File > Swift Packages > Add Package Dependency
Add https://github.com/deskpro/messenger-sdk-ios
Select “Up to Next Major” version
Manual installation
Although we recommend using SPM, it is also possible to clone this repository manually, and drag and drop it into the root folder of the application.
Initialization (Swift)
First, import the SDK:
import messenger_sdk_ios
Then, in your ViewController:
let messengerConfig = MessengerConfig(appUrl: "YOUR_APP_URL", appId: "YOUR_APP_ID")
var messenger: DeskPro?
Replace YOUR_APP_URL and YOUR_APP_ID with your app’s URL and ID.
A collection of Open Source components to develop modules for COBI.Bike – the perfect fusion of smartphone and bike.
💡 Interactive Demo: Learn the fundamentals
The quickest way to learn the DevKit basics without writing any code.
Change location coordinates and hit thumb controller buttons to see COBI.js in action. This simulates data and interaction events that will later be provided by the COBI.Bike system when riding a bike. Bonus points for directly tweaking the code e.g. subscribing to additional data from the COBI.js data stream.
🚀 Let’s get started with your first project
It only takes a few lines of javascript to turn Web Apps into a module:
Step 1: Add boilerplate code
To get your Web App ready just add COBI.js at the end of the body section of your HTML:
and pass an authentication token to the COBI.init function before subscribing to the data stream.
Tokens are not issued yet, so you can use any string for now:
// Authenticate your moduleCOBI.init('token — can be anything right now')
It’s that easy: Any Web App + COBI.js = Module!
Step 2: Hook into the data stream
Enough with the boilerplate code, let’s make our new module respond to the handlebar remote control:
COBI.hub.externalInterfaceAction.subscribe(function(action){console.log('I just tapped the handlebar remote and instantly received this '+action+' in my Web App');});
or visualize the cadence acquired by COBI.Bike app from an external Bluetooth sensor or e-bike motor:
COBI.rideService.cadence.subscribe(function(cadence){console.log('Your current cadence is '+cadence+' rpm.');});
There is a ton of data available such as current speed, course, heart-rate (if heart-rate monitor is connected), power, calories burned and much more. Our COBI.js reference will be your friend.
🔬 Test your module
Now that you have supercharged your Web App, you can test your module either in the Chrome browser on your machine or directly in the COBI.Bike iOS App on your bike.
Browser testing
Just install the DevKit Simulator Chrome Extension, open up the Developer Tools (⌘ + Option + i / Ctrl + Shift + j) and select the »COBI.Bike« tab.
To get the best experience, switch on the phone mode in the upper left corner and rotate the device to landscape.
To simulate riding and fitness data you can play back one of our sample cobitrack or GPX files.
On-bike testing
If you don’t own a COBI.Bike yet, apply for a hardware development kit at cobi.bike/devkit or purchase one at get.cobi.bike. Afterwards, register as a developer to test your module on your bike.
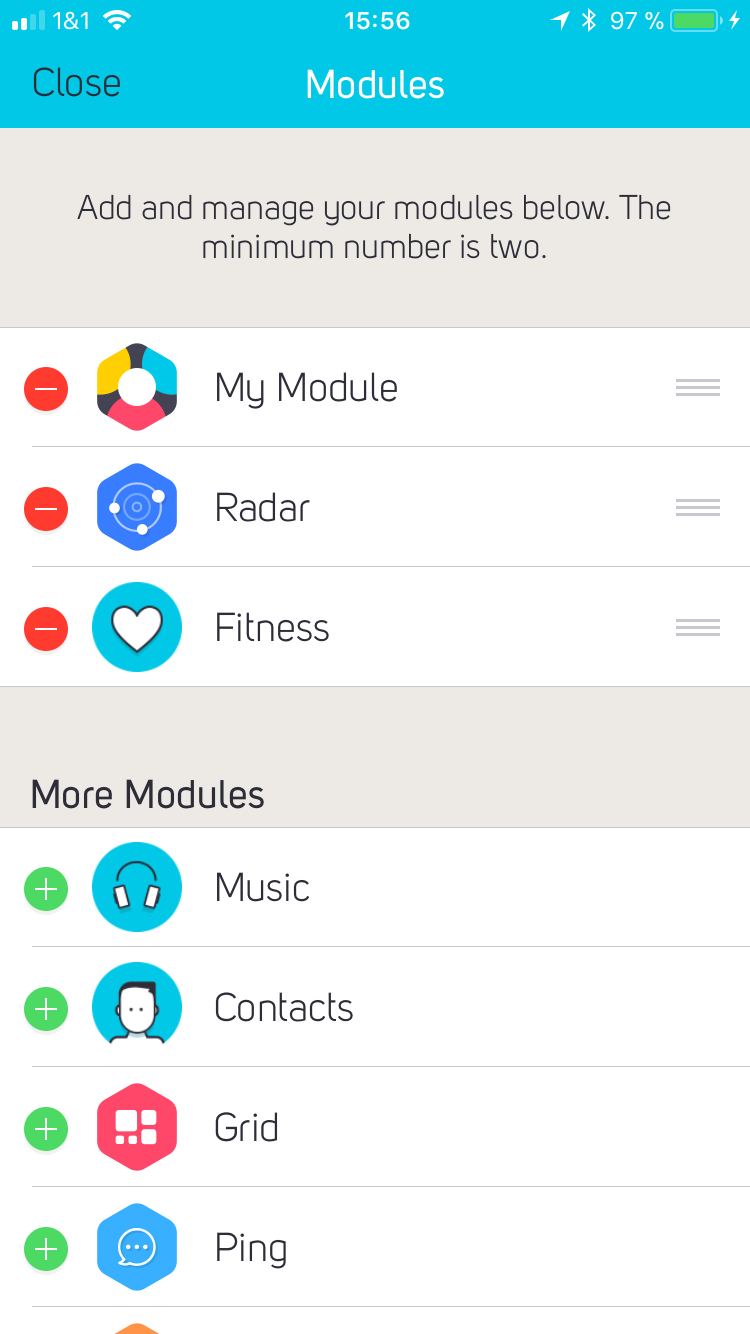
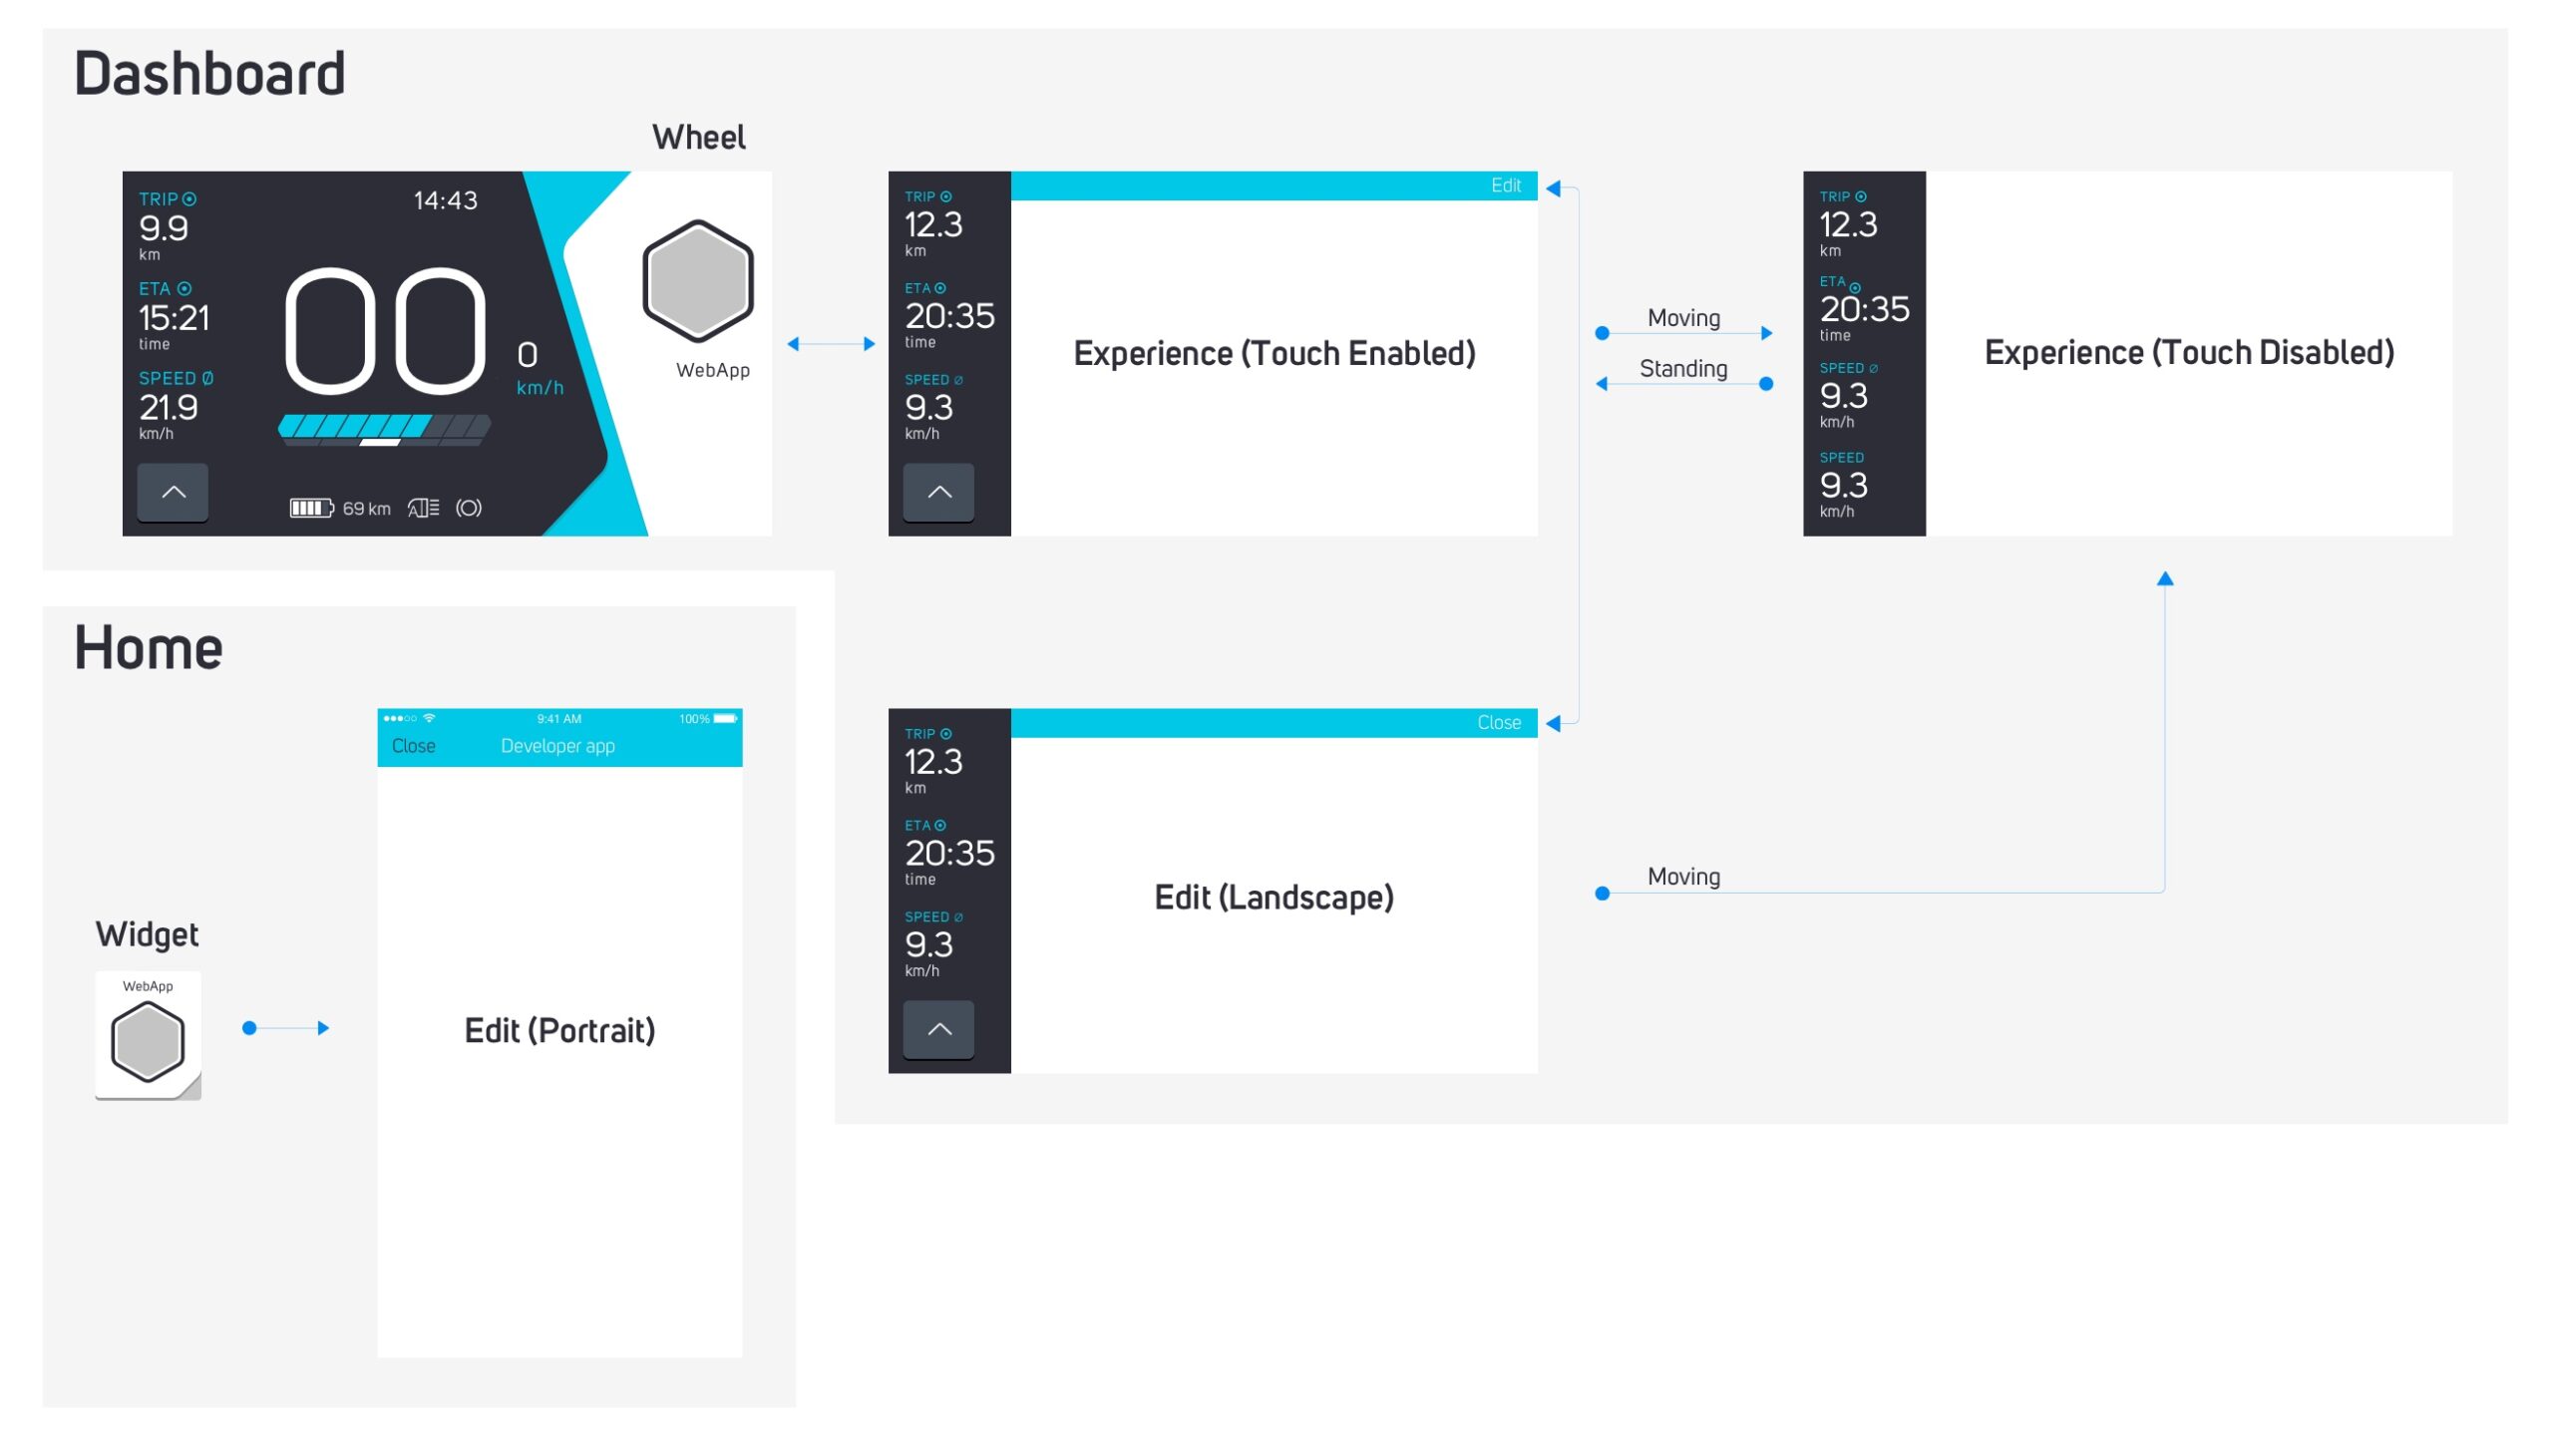
Ready? Then open up the COBI.Bike app on your iPhone and open the edit modules screen. As developer you can now choose from a number of examples modules or add you own via »My Module«
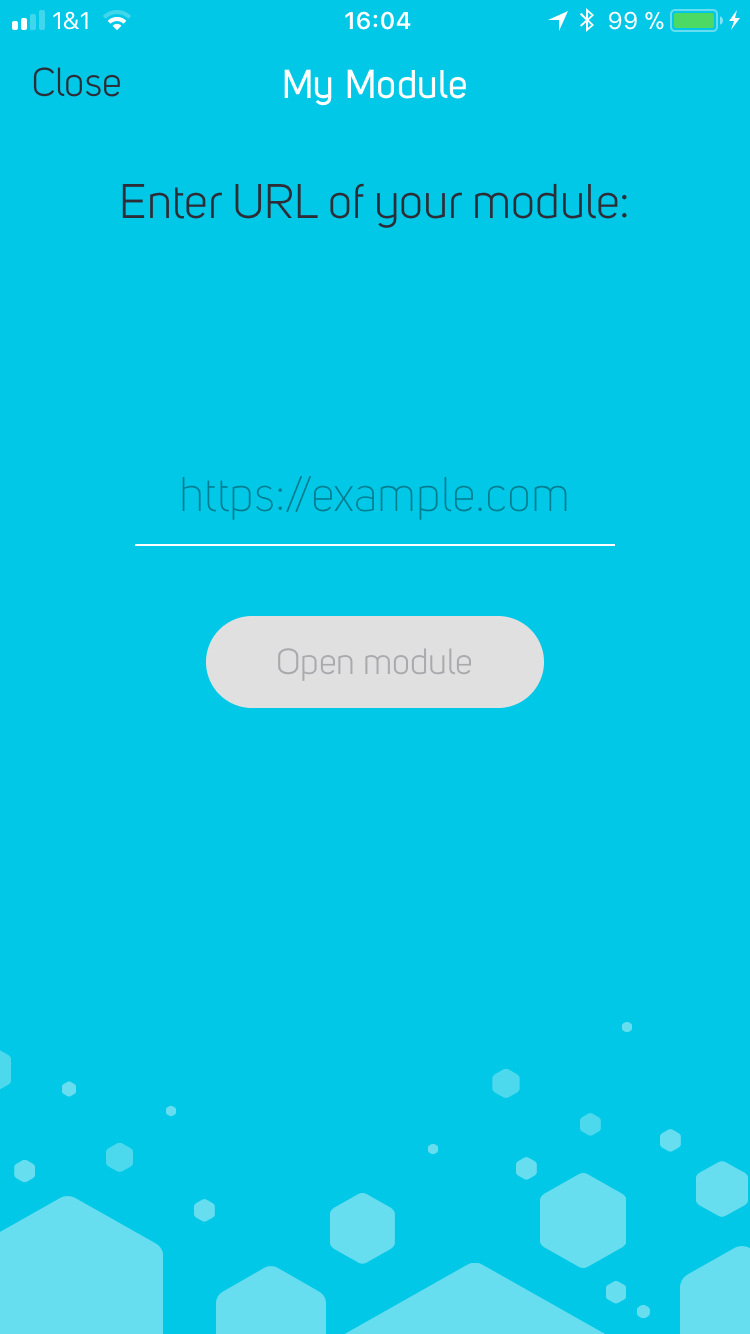
When you open »My Module« on the home screen or the dashboard, you can enter the URL of your module (it can be hosted wherever you want, but we have some suggestions below). When you press »Open module« your module is loaded and hooked up to the app. Now you can easily test your idea on your 🚲.
🏓 Play ping-pong with the COBI.Bike app
Take advantage of interfaces to the native COBI.Bike app to save yourself a lot of work.
There are 4 contexts you should support. You can check COBI.parameters.context() at any time to decide if some sort of settings should be shown (COBI.context.onRideSettings or COBI.context.offRideSettings) or if the actual module is requested (COBI.context.onRide or COBI.context.offRide). To share information between the two contexts and in between user sessions use the web standard Local Storage.
Touch Interaction Changes
While riding, the user is encouraged to use the thumb controller instead of interacting with the UI via touch. Subscribe to changes of this value to make the best out of both situations. Please note that a bar is shown at the top while touchInteractionEnabled is false — make sure it is not overlapping with your UI.
COBI.app.touchInteractionEnabled.subscribe(function(enabled){// Adapt your UI});
🌈 Everything else about the DevKit
Debugging Tips & Tricks
For seing javascript errors in the native App, activate the “Show module errors” option in the “Diagnostics” section
To get better error messages when interacting with the COBI.js API, include https://cdn.cobi.bike/cobi.js/0.44.0/cobi.dev.js instead of the script mentioned above (please note: the dev version is considerably larger which has a big impact on the loading time)
To show a native dialog when running inside the iOS App, just use a normal alert("your messages") (only for debugging)
When developing in Chrome, use the phone button in the upper left corner of the Chrome Developer Tools and rotate it to landscape to see how it looks while riding
When using the Chrome Simulator, press the Print state to console button to print the current COBI.js state to the Chrome Developer Tools Console
To change the current context append ?context=onRide or your desired context to your URL in the browser.
Read our Interface Guidelines to understand the unique challenges of developing software for bikes and to learn more about how the COBI.Bike system and modules work.
Episomizer is currently a semi-automated pipeline for constructing double minutes (aka. episome)
using WGS data.
Episomizer consists of two major components:
Bam mining extract the reads around the boundaries of highly amplified genomic regions,
search for evidence of soft-clipped reads, discordant reads, and bridge reads that support
putative SVs (aka. edges) between any two segment boundaries. The reported putative edges are subject
to manual review.
Composer takes inputs of manually reviewed edges associated with the segment boundaries together
with the highly amplified genomic segments, composes the segments to form simple
cycles as candidates of circular DNA structures.
Citation
Xu, K., Ding, L., Chang, TC., Shao, Y., Chiang, J., Mulder, H., Wang, S., Shaw, T.I., Wen, J.,
Hover, L., McLeod, C., Wang, YD., Easton, J., Rusch, M., Dalton, J., Downing, J.R., Ellison, D.W.,
Zhang, J., Baker, S.J., Wu, G.
Structure and evolution of double minutes in diagnosis and relapse brain tumors.
Acta Neuropathologica, Sep 2018, DOI: 10.1007/s00401-018-1912-1.
Usage:
    episomizer <SUBCOMMAND> [args...]
Subcommands:
    create_samtools_cmd    Create samtools command file to extract reads around segment boundaries
    create_softclip2fa_cmd Create command file to extract softclip reads
    create_blat_cmd        Create command file to blat softclip reads
    SV_softclip            Create read count matrix for softclip reads supported SVs
    SV_discordant          Create read count matrix for discordant reads supported SVs
    SV_bridge              Create read count matrix for bridge reads supported SVs
    matrix2edges           Convert read count matrix to putative edges
    composer               Compose segments and edges to identify circular DNA structures
For details on how to run the semi-automated pipeline, see the following Procedure section. For a concrete example of constructing double minutes on a mini-bam file, see examples page.
Procedure
Step 1: Determine a threshold for highly amplified genomic segments based on the empirical distribution
of Log2Ratio of copy number data.
Step 2: Get the putative edges.
Generate the shell script with samtools commands to extract the reads around segment boundaries.
For all 3 types of putative edges (softclip, discordant, and bridge) from the above output, they are sorted by the total number of supporting reads from high to low.
These putative edges need to be manually reviewed by examining the boundary reads and their Blat results in the “trace” folder,
as well as by examining the coverage depth around the segments on IGV to refine the segment boundaries. Edges with few reads support
on each side are usually spurious or indicate minor clones which we do not consider in our current study. The basic review process is described below:
For the softclip edges, the edges that represent adjacent segments should be annotated first. Then for the rest of the
edges, their Blat output need to be manually reviewed to determine the orientations of two joined segments such that
true edge will be annotated and accompanying false edges will be removed.
For the discordant edges, the edges that are already reviewed in the softclip edges can be removed first. Then for the
rest of the edges, their boundary reads (in SAM format) need to be manually reviewed, especially the FLAG column, to determine
the orientations of two joined segments such that true edge will be annotated and accompanying false edges will be removed.
For the bridge edges, the edges that are already reviewed in the softclip and discordant edges can be removed first.
Then for the rest of the edges, their boundary reads (in SAM format) need to be manually reviewed to determine if their bridging segment’s
orientation is in harmony with those of the two joined segments. True edge will be annotated and accompanying false edges will be removed.
In addition, if the reads support from both sides are off balance (for example, AtoB is 1 but BtoA is 100), the edge is most likely to be spurious.
The reviewed edges from the 3 putative edges files are combined into one “edge” file as part of the input for the next step.
The key features of the BitTube Blockchain Explorer are:
no cookies, no web analytics trackers, no images,
open sourced,
made fully in C++,
showing encrypted payments ID,
showing ring signatures,
showing transaction extra field,
showing public components of BitTube addresses,
decoding which outputs and mixins belong to the given BitTube address and viewkey,
can prove that you send BitTube to someone,
detailed information about ring members, such as, their age, timescale and their ring sizes,
showing number of amount output indices,
support BitTube testnet and stagnet networks,
tx checker and pusher for online pushing of transactions,
estimate possible spendings based on address and viewkey,
can provide total amount of all miner fees,
decoding encrypted payment id,
decoding outputs and proving txs sent to sub-address.
listing RandomX code for each block
Compilation on Ubuntu 16.04/18.04
Compile latest BitTube development version
Download and compile recent BitTube into your home folder:
# first install BitTube dependecines
sudo apt update
sudo apt install git build-essential cmake libboost-all-dev miniupnpc libunbound-dev graphviz doxygen libunwind8-dev pkg-config libssl-dev libcurl4-openssl-dev libgtest-dev libreadline-dev libzmq3-dev libsodium-dev libhidapi-dev libhidapi-libusb0
# go to home foldercd~
git clone --recursive https://github.com/ipbc-dev/bittube.git bittube
cd bittube/
https://github.com/bittubeexamples/bittube-compilation/blob/master/README.md
##### Compile and run the explorer
Once the BitTube is compiled, the explorer can be downloaded and compiled
as follows:
```bash# go to home folder if still in ~/bittubecd~# download the source codegit clone https://github.com/ipbc-dev/bittube-blockchain-explorer.git# enter the downloaded sourced code foldercd bittube-blockchain-explorer# make a build folder and enter itmkdir build &&cd build# create the makefilecmake ..# alternatively you can use: cmake -DBITTUBE_DIR=/path/to/bittube_folder ..# if BitTube is not in ~/bittube## also can build with ASAN (sanitizers), for example# cmake -DSANITIZE_ADDRESS=On ..# compilemake
To run it:
./bittube-blockchain-explorer
By default it will look for blockchain in its default location i.e., ~/.bittube/lmdb.
You can use -b option if its in different location.
[mwo@arch bittube-blockchain-explorer]$ ./bittube-blockchain-explorer
2016-May-28 10:04:49.160280 Blockchain initialized. last block: 1056761, d0.h0.m12.s47 time ago, current difficulty: 1517857750
(2016-05-28 02:04:49) [INFO    ] Crow/0.1 server is running, local port 8081
bittube-blockchain-explorer, BitTube Blockchain Explorer:
  -h [ --help ] [=arg(=1)] (=0)         produce help message
  -t [ --testnet ] [=arg(=1)] (=0)      use testnet blockchain
  -s [ --stagenet ] [=arg(=1)] (=0)     use stagenet blockchain
  --enable-pusher [=arg(=1)] (=0)       enable signed transaction pusher
  --enable-randomx [=arg(=1)] (=0)      enable generation of randomx code
  --enable-mixin-details [=arg(=1)] (=0)
                                        enable mixin details for key images,
                                        e.g., timescale, mixin of mixins, in tx
                                        context
  --enable-key-image-checker [=arg(=1)] (=0)
                                        enable key images file checker
  --enable-output-key-checker [=arg(=1)] (=0)
                                        enable outputs key file checker
  --enable-json-api [=arg(=1)] (=0)     enable JSON REST api
  --enable-as-hex [=arg(=1)] (=0)       enable links to provide hex
                                        represtations of a tx and a block
  --enable-autorefresh-option [=arg(=1)] (=0)
                                        enable users to have the index page on
                                        autorefresh
  --enable-emission-monitor [=arg(=1)] (=0)
                                        enable BitTube total emission monitoring
                                        thread
  -p [ --port ] arg (=8081)             default explorer port
  -x [ --bindaddr ] arg (=0.0.0.0)      default bind address for the explorer
  --testnet-url arg                     you can specify testnet url, if you run
                                        it on mainnet or stagenet. link will
                                        show on front page to testnet explorer
  --stagenet-url arg                    you can specify stagenet url, if you
                                        run it on mainnet or testnet. link will
                                        show on front page to stagenet explorer
  --mainnet-url arg                     you can specify mainnet url, if you run
                                        it on testnet or stagenet. link will
                                        show on front page to mainnet explorer
  --no-blocks-on-index arg (=10)        number of last blocks to be shown on
                                        index page
  --mempool-info-timeout arg (=5000)    maximum time, in milliseconds, to wait
                                        for mempool data for the front page
  --mempool-refresh-time arg (=5)       time, in seconds, for each refresh of
                                        mempool state
  -c [ --concurrency ] arg (=0)         number of threads handling http
                                        queries. Default is 0 which means it is
                                        based you on the cpu
  -b [ --bc-path ] arg                  path to lmdb folder of the blockchain,
                                        e.g., ~/.bittube/lmdb
  --ssl-crt-file arg                    path to crt file for ssl (https)
                                        functionality
  --ssl-key-file arg                    path to key file for ssl (https)
                                        functionality
  -d [ --deamon-url ] arg (=http:://127.0.0.1:24182)
                                        Monero daemon url
  --daemon-login arg                    Specify username[:password] for daemon
                                        RPC client
Obtaining current BitTube emission amount is not straight forward. Thus, by default it is
disabled. To enable it use --enable-emission-monitor flag, e.g.,
This flag will enable emission monitoring thread. When started, the thread
will initially scan the entire blockchain, and calculate the cumulative emission based on each block.
Since it is a separate thread, the explorer will work as usual during this time.
Every 10000 blocks, the thread will save current emission in a file, by default,
in ~/.bittube/lmdb/emission_amount.txt. For testnet or stagenet networks,
it is ~/.bittube/testnet/lmdb/emission_amount.txt or ~/.bittube/stagenet/lmdb/emission_amount.txt. This file is used so that we don’t
need to rescan entire blockchain whenever the explorer is restarted. When the
explorer restarts, the thread will first check if ~/.bittube/lmdb/emission_amount.txt
is present, read its values, and continue from there if possible. Subsequently, only the initial
use of the tread is time consuming. Once the thread scans the entire blockchain, it updates
the emission amount using new blocks as they come. Since the explorer writes this file, there can
be only one instance of it running for mainnet, testnet and stagenet. Thus, for example, you cant have
two explorers for mainnet
running at the same time, as they will be trying to write and read the same file at the same time,
leading to unexpected results. Off course having one instance for mainnet and one instance for testnet
is fine, as they write to different files.
When the emission monitor is enabled, information about current emission of coinbase and fees is
displayed on the front page, e.g., :
BitTube emission (fees) is 14485540.430 (52545.373) as of 1313448 block
The values given, can be checked using BitTube daemon’s print_coinbase_tx_sum command.
For example, for the above example: print_coinbase_tx_sum 0 1313449.
To disable the monitor, simply restart the explorer without --enable-emission-monitor flag.
Enable SSL (https)
By default, the explorer does not use ssl. But it has such a functionality.
As an example, you can generate your own ssl certificates as follows:
Note: Because we generated our own certificate, modern browsers will complain
about it as they cant verify the signatures against any third party. So probably
for any practical use need to have properly issued ssl certificates.
JSON API
The explorer has JSON api. For the API, it uses conventions defined by JSend.
By default the api is disabled. To enable it, use --enable-json-api flag, e.g.,
./bittube-blockchain-explorer --enable-json-api
api/transaction/<tx_hash>
curl -w "\n" -X GET "http://127.0.0.1:8081/api/transaction/6093260dbe79fd6277694d14789dc8718f1bd54457df8bab338c2efa3bb0f03d"
For txprove=0 we check which outputs belong to given address and corresponding viewkey.
For txprove=1 we use to prove to the recipient that we sent them founds.
For this, we use recipient’s address and our tx private key as a viewkey value,
i.e., viewkey=<tx_private_key>
Checking outputs:
# we use here official BitTube project's donation address as an example
curl  -w "\n" -X GET "http://127.0.0.1:8081/api/outputs?txhash=17049bc5f2d9fbca1ce8dae443bbbbed2fc02f1ee003ffdd0571996905faa831&address=44AFFq5kSiGBoZ4NMDwYtN18obc8AemS33DBLWs3H7otXft3XjrpDtQGv7SqSsaBYBb98uNbr2VBBEt7f2wfn3RVGQBEP3A&viewkey=f359631075708155cc3d92a32b75a7d02a5dcf27756707b47a2b31b21c389501&txprove=0"
We use recipient’s address (i.e. not our address from which we sent xmr to recipient).
For the viewkey, we use tx_private_key (although the GET variable is still called viewkey) that we obtained by sending this txs.
# this is for testnet transaction
curl  -w "\n" -X GET "http://127.0.0.1:8082/api/outputs?txhash=94782a8c0aa8d8768afa0c040ef0544b63eb5148ca971a024ac402cad313d3b3&address=9wUf8UcPUtb2huK7RphBw5PFCyKosKxqtGxbcKBDnzTCPrdNfJjLjtuht87zhTgsffCB21qmjxjj18Pw7cBnRctcKHrUB7N&viewkey=e94b5bfc599d2f741d6f07e3ab2a83f915e96fb374dfb2cd3dbe730e34ecb40b&txprove=1"
api number is store as uint32_t. In this case 65536 represents
major version 1 and minor version 0.
In JavaScript to get these numbers, one can do as follows:


 https://github.com/Inna-Mykytiuk/boat